Vegan Recipes from Cassie Howard

Vegan Insanity >> Vegan recipes that are delicious and easy to make. Plus, kitchen, cooking & shopping tips!

  • Home
  • About
    • Inside My Vegan Pantry
    • My 1 Year Vegan Anniversary
    • How I Got Over My Cheese Addiction
  • Recipes
    • Breakfast
    • Lunch
    • Dinner
    • Dessert
    • Snacks/Appetizers
  • Resources
    • Is it Expensive to be Vegan?
    • Top 10 Kitchen Tools
    • Top 10 Cookbooks
    • Vegan Picks
    • How-to Guides
    • Cooking Tips
    • Recipe Ideas
  • Contact

Best Ever Vegan Fried Rice with Scrambled Tofu

May 9, 2014 36 Comments

075

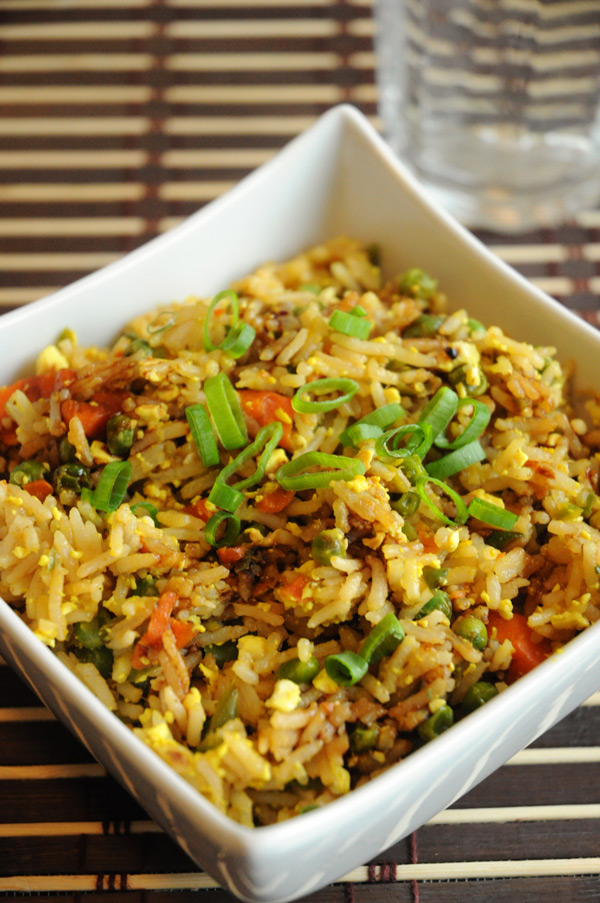
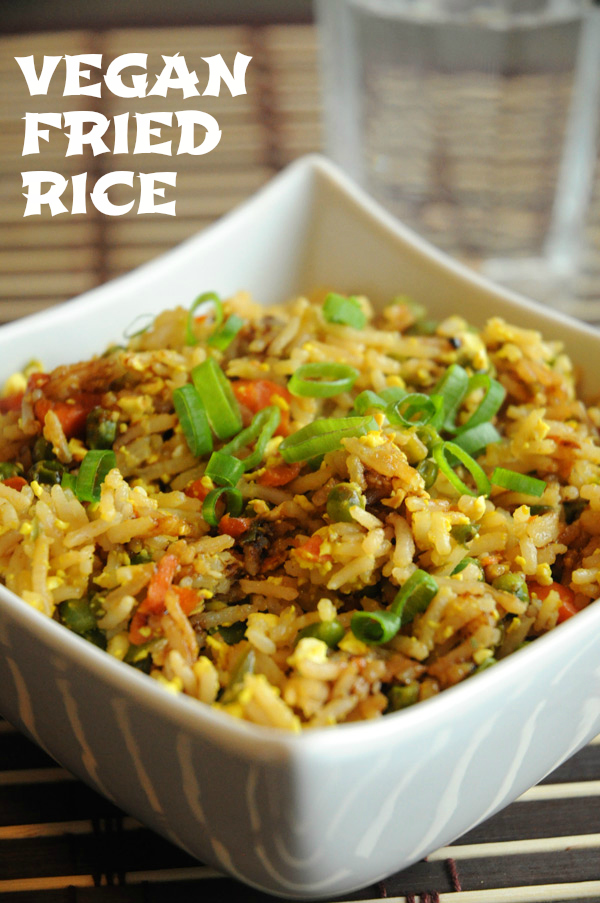
I can’t even explain how good this fried rice is. I came up with the recipe on a whim awhile back. It was my first time making fried rice since becoming vegan in September of last year, and I wanted it to taste as good as I remembered fried rice tasting.

Thankfully, with a few additions (and subtractions!), this dish turned out remarkable. Even my husband, who only groans like crazy when his food is MEGA GOOD, couldn’t keep his mouth shut about it.

“You HAVE to blog this”, he said. “You HAVE TO. It’s SO GOOD.”

And so, here I am. Blogging it.

Fried-Rice-Vegan-Homemade

Traditional fried rice is made with fried egg and some kind of meat. Usually bacon – at least, that’s what was always in my fried rice growing up.

So, I had to either eliminate those ingredients, or come up with some substitutions.

I went the substitution route.

Fried-Rice-Vegan

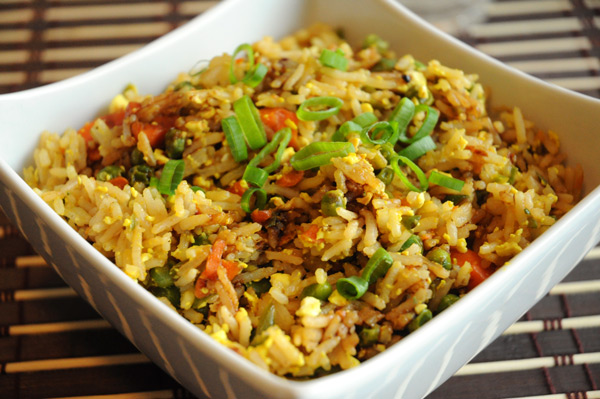
Instead of fried egg, I added scrambled tofu, which gave the dish that yellow colour that cooked eggs do.

For bacon, I had a few options. I could use fake meat, but didn’t want to, I could use coconut bacon – but I’m not a big fan of coconut bacon, and I didn’t feel like making anything bacon-like, so I did the next best thing – I used liquid smoke in the sauce.

And guess what – it worked like a charm. Bacon flavour without the bacon. Hurrah!

Homemade-Vegan-Fried-Rice

Vegan-Fried-Rice

This is now one of my go-to meals when I am too tired to dream up something creative.

If you can cook the rice in advance, that will save you a lot of cooking time, since rice can take up to 45 minutes to cook (depending on the type you use – brown rice takes me 45 minutes to cook).

Vegan-Fried-Rice

Best Ever Vegan Fried Rice with Scrambled Tofu
Recipe Type: Entree
Author: Vegan Insanity
Prep time: 10 mins
Cook time: 1 hour
Total time: 1 hour 10 mins
Serves: 4
Whether you serve it for lunch or dinner, this vegan fried rice is one of the best you’ll ever make! It’s simple, delicious, and healthy – what more could you ask for?
Ingredients
  • Rice
  • 1 1/2 cups uncooked rice (I used brown rice)
  • Scrambled Tofu
  • 1/2 block extra firm tofu, pressed for at least 20 minutes
  • 1/2 tsp turmeric
  • 1/2 tbsp nutritional yeast
  • 1/4 tsp salt
  • 1/4 tsp onion powder
  • 1/4 tsp freshly ground black pepper
  • 1/2 tbsp olive oil
  • 1 small garlic clove, minced
  • Vegetables
  • 2 tsp olive oil
  • 1 medium carrot, diced (very small!)
  • 2/3 cup frozen peas
  • Green onions for garnish (optional)
  • Sauce
  • 2 tbsp tamari
  • 1/4 tsp salt
  • 1/2 tsp freshly ground black pepper
  • 1/4 tsp liquid smoke
  • 1 tsp sesame oil
  • 1 medium garlic clove, minced or grated
  • 1/2 tsp onion powder
  • 1 1/2 tbsp rice wine vinegar
  • 1 tbsp brown sugar
  • 2 tsp sriracha sauce (or to the heat of your liking!)
Instructions
Rice
  1. Cook rice according to package directions and set aside.
Scrambled Tofu
  1. Crumble the pressed tofu in a small bowl. Add in the turmeric, nutritional yeast, salt, onion powder, and pepper. Mix well and set aside.
  2. Heat the oil in a medium pan over medium heat.
  3. Add the minced garlic and cook for a minute or so, or until the garlic has browned lightly.
  4. Add in the tofu mixture and cook for about 5-7 minutes more, stirring often. Remove from pan and set aside.
Vegetables
  1. In the same pan that you used to cook your tofu, heat 2 tsp olive oil over medium heat, then add in the carrots and peas.
  2. Cook for about 5 minutes, or until the carrots can easily be pierced with a sharp knife. Set aside.
Sauce
  1. Whisk together all of the sauce ingredients and set aside.
Putting it all together
  1. In a large pan or wok over medium heat, add your sauce, then the rice, then the vegetables, then the scrambled tofu.
  2. Mix everything together very well, and cook until heated through, about 5 minutes.
  3. Serve, topped with a sprinkling of chopped green onions, if desired.
3.2.2807


Filed Under: Entrees, Recipes Tagged With: dinner, lunch, nut-free, soy free

Homemade Vegan Calzones with Sun-Dried Tomato & Pesto Spread

May 8, 2014 13 Comments

homemade-vegan-calzones

I don’t think you’ll find many people who don’t like pizza, but sometimes, pizza just ain’t enough – you need something new, something different.

And so, the calzone was born. I’ve never found a store-bought calzone I’ve ever liked, but this homemade version is crazy good.

Calzones-Vegan

The possibilities are endless when it comes to what you can put in your calzone! For this recipe, I chose zucchini, green olives, spinach, and a bit of vegan cheese shreds (mozzarella). Super tasty!

I love how the sauce/spread is used, instead of just regular ol’ tomato sauce. It makes the calzone much more interesting. The flavour of that stuff is incredible!

The dough is flaky, with just enough “chew” to make it taste exactly like pizza crust. What could be better than a pizza folded in half, and stuffed full of all your favourite pizza toppings?

Vegan-Calzones

Homemade Vegan Calzones with Sun-Dried Tomato & Pesto Spread
Recipe Type: Pizza
Author: Vegan Insanity
Prep time: 1 hour 15 mins
Cook time: 10 mins
Total time: 1 hour 25 mins
Serves: 3-4
Ingredients
  • Dough
  • 1 1/2 Cups kamut or all-purpose flour
  • 1 1/8 tsp fast acting yeast
  • 1/2 tsp salt
  • 1/2 tbsp coconut sugar
  • 1 tbsp olive oil
  • 3/4 cup warm water, or as needed
  • Sun-Dried Tomato & Pesto Spread
  • 1/2 cup raw cashews (soaked for at least 4 hours)
  • 1 large garlic clove
  • 1/3 cup sun-dried tomatoes, drained
  • 1 medium tomato
  • 1/3 cup fresh basil, packed
  • 1/4 tsp chili powder
  • 1/4 tsp freshly ground black pepper
  • 1/2 tsp salt
  • 2 tbsp olive oil
  • Assembly
  • Veggies of your choice
  • Vegan cheese (optional, but recommended)
Instructions
Dough
  1. Add the flour, yeast, salt, sugar and oil to a large mixing bowl. Mix until combined.
  2. Add the water, as needed, until the dough is soft and has come together nicely. Form into a ball.
  3. Place the dough ball in a well-oiled bowl and cover with a clean dish towel. Allow to rise, until it has doubled in size, which can take up to 1 hour (it was 40 minutes for me).
Sun-Dried Tomato & Pesto Spread
  1. Add all ingredients to a high-powered blender or food processor and blend/processed until smooth, adding a bit of water, if needed.
Assembly
  1. Preheat oven to 500F.
  2. Divide the dough into 3 or 4 portions. and roll each one into a thin layer. Be careful not to make them too thick!
  3. Spread the sauce on each calzone, without going all the way to the edges.
  4. Add the “toppings” – veggies and vegan cheese – on one side of the calzone.
  5. Fold into a semicircle and seal the edges.
  6. Poke a few holes into each calzone, brush with a bit of oil, and sprinkle some dried basil on top (or fresh!).
  7. Cook for about 10 minutes, or until the bottoms have browned nicely.
  8. Enjoy!
3.2.2310


Filed Under: Pizza, Recipes Tagged With: dinner, lunch, soy free

Loaded Breakfast Potatoes with Mushroom Gravy

May 7, 2014 7 Comments

Loaded-Breakfast-Potatoes

I have a thing for big, hot, savory breakfasts. They’re what I look forward to every morning! First, my daily smoothie, then a big plate of something yummy – usually potatoes.

Yesterday morning was no different. I woke up craving potatoes – but not my usual hash browns with veggies. No, I wanted something a bit more elaborate.

Enter – loaded breakfast potatoes (with some mushroom gravy inspiration from Jackie)!

Breakfast-Potatoes

You know, I’ve never been a big fan of mushrooms, but I love them in vegan gravy. So when I saw a bunch of cremini mushrooms on sale this past weekend, I snatched them up, knowing that a pot of mushroom gravy was in my future.

And what’s the best thing to do with gravy? Pour it over potatoes, of course!

So, that’s just what I did with this breakfast dish.

Vegan-Breakfast-Potatoes

Loaded-Vegan-Breakfast-Potatoes

I suggest cooking the gravy first, then keeping it warm on the stove while you prepare your potatoes. Or you can cook them at the same time, if you’re good at multi-tasking!

Use any ol’ greens you like in this dish – I used dandelion greens because I thought they’d work well, but I also think spinach, kale, arugula and even collards would be very tasty!

Pile your loaded potatoes on a plate and drown them in mushroom gravy. Then go ahead and stuff your face. It will be hard not to!

Breakfast-Potatoes-Vegan

Adapted from Vegan Yack Attack.

Loaded Breakfast Potatoes with Mushroom Gravy
Recipe Type: Breakfast
Author: Vegan Insanity
Prep time: 10 mins
Cook time: 40 mins
Total time: 50 mins
Serves: 3 large servings
Ingredients
  • Mushroom Gravy
  • 1 1/2 cups coconut milk, light or full-fat (I used full-fat)
  • 1/4 cup onion, minced
  • 2 garlic cloves, minced
  • 1/4 cup cremini mushrooms, chopped very small
  • 1 tablespoon corn starch
  • 2 1/2 tbsp nutritional yeast
  • 1 tbsp tamari
  • Salt & freshly ground black pepper, to taste
  • Potatoes
  • 1 tbsp olive oil
  • 3 cups russet potatoes, chopped into small cubes
  • 1/4 cup onion, minced
  • 1/4 cup tomato, diced
  • 1/4 cup red bell pepper, diced
  • Salt & freshly ground black pepper, to taste
  • 3/4 cup dandelion greens, chopped
Instructions
Mushroom Gravy
  1. In a small pot, add 1/4 cup of your coconut milk, and bring it to a simmer over medium heat.
  2. Next, add the onion, saute for 2-3 minutes, then add in the garlic. Cook for another 2-3 minutes, or until the onions are slightly clear.
  3. Add the mushrooms and saute until they have darkened and reduced in size, about 7 minutes.
  4. Add the corn starch and mix it in very well.
  5. Add the rest of the coconut milk, the nutritional yeast and the tamari. Bring to a boil, then cook on low, stirring occasionally, until the gravy reaches the consistency you like (took about 5 minutes for me). Season with salt & pepper and serve over your cooked potatoes.
Potatoes
  1. Heat olive oil in a large pan over medium heat. Once it’s hot, add the potatoes, cover, and cook for about 12 minutes, stirring occasionally.
  2. Add the onions, and cook for about 5 minutes more.
  3. Add the tomatoes and bell pepper. Cook, uncovered, 5-10 minutes more, or until the potatoes are crispy and browned.
  4. Fold in the dandelion greens, and then season with salt and pepper.
3.2.2310


Filed Under: Breakfast, Recipes Tagged With: nut-free

My Favourite Vegan Chili

May 6, 2014 2 Comments

Veggie-Chili

I love chili. I don’t even care if it’s so hot outside that my hair sticks to my face and I can’t breathe if I’m in the sun for longer than 5 minutes.

Chili is another one of my favourite comfort foods. I can eat it all year round. It’s yumminess in a bowl!

Vegan-Vegetable-Chili

Thankfully, this vegan chili is a healthy one. It’s loaded with tons of vegetables, beans and infused with tasty chili seasonings. So go ahead, eat a bowl – or two – and don’t feel guilty about it at all!

Vegan-Chili

I had some leftover vegan nacho cheese, so I topped my chili with that, and a sprinkling of green onions (because green onions make any dish better).

Also? Fresh bread is a must with chili! Although it’s good on it’s own, this chili is extra good slathered on bread. Crushed tortilla chips are also delicious with chili! It gives the dish some crunch, which is nice.

Vegetable-Chili

This dish freezes very well, too, so it’s a great meal to make more of than you need. Pop the extras in the freezer and you have a healthy meal waiting for you on a night you don’t have time to cook dinner!

My Favourite Vegan Chili
Recipe Type: Lunch, Dinner
Author: Vegan Insanity
Prep time: 10 mins
Cook time: 50 mins
Total time: 1 hour
Serves: 4-5
Ingredients
  • 2 tbsp olive oil
  • 1/3 cup celery, chopped
  • 1/3 cup red bell pepper, chopped
  • 1 cup onion, chopped small
  • 2 large garlic cloves, minced
  • 6 cups diced tomatoes, canned or fresh
  • 1 tbsp chili powder
  • 1 tsp oregano
  • 1 tsp cumin
  • 1 tsp salt
  • 1/2 tsp freshly ground black pepper
  • 1/2 cup cooked black beans (if using canned, drain and rinse first)
  • 1/2 cup cooked red kidney beans (if using canned, drain and rinse first)
  • 1/4 cup cooked chickpeas (if using canned, drain and rinse first)
Instructions
  1. Heat olive oil in a large pot over medium heat.
  2. Add celery, red bell pepper and onions to the pot, and let them cook for about 5 minutes, or until the onions are lightly browned, and the celery and bell pepper are slightly softened.
  3. Add in the garlic and cook for another 2 minutes or so, until the garlic has also lightly browned.
  4. Add in the diced tomatoes, chili powder, oregano, cumin, salt and pepper. Mix well. If it looks too thick, add some vegetable broth or water, 1/2 cup at a time. Remember that it will thicken up as it cooks, so you don’t want it to be too thick when it first goes in there.
  5. Cook for about 10 minutes, then add in the black beans, kidney beans and chickpeas, and stir.
  6. Cook for another 20-30 minutes, or until thickened to your desired consistency.
  7. Serve, topped with vegan nacho cheese, vegan cheese shreds, vegan sour cream, chopped green onions, or whatever else you like on your chili!
3.2.2310


Filed Under: Entrees, Recipes Tagged With: beans and legumes, dinner, lunch

Raw Vegan Lime Tart with Cashew Cream

May 5, 2014 5 Comments


Raw-Vegan-Lime-Tart

I saw this yummy dessert recipe on Neely’s site a few weeks back, and added it to my to-make file, until this past weekend when I finally made it.

And oh my, was it ever good. I’m ashamed that I waited so long to make it, because it was incredible.

Lime-Tart-Raw-Vegan

I made a few substitutions and added some ingredients to my preference, and in the end, this turned into one of my favourite desserts I’ve ever made! I thought I was a lemon lover, but… limes are certainly growing on me, that’s for sure.

I used my food processor to make the crust and my Blendtec blender to make the cashew cream, and both worked well. I wish I had a tart pan, because that would have made my “tart” look better, but I didn’t, so I just used an 8×8 baking dish (which was a bit too large, so I only spread the crust out using about 3/4 of the pan dimmensions).

It worked, and it tasted delicious, and that’s all that really matters anyway, right?

Vegan-Lime-Tart-Raw

Adapted from Neely Wang.

Raw Vegan Lime Tart with Cashew Cream
Recipe Type: Dessert
Author: Vegan Insanity
Prep time: 1 hour 15 mins
Total time: 1 hour 15 mins
Serves: 6-12
Ingredients
  • Crust
  • 1 cup medjool dates, pitted
  • 1/3 cup walnuts
  • 1/3 cup cashews
  • 1/3 cup almonds
  • 1 tsp vanilla
  • 1/2 tsp salt
  • 1/4 tsp cinnamon
  • 1 tsp lime zest
  • Cashew Cream
  • 2 cups raw cashews (soaked for at least 4 hours)
  • 1/3 cup lime juice
  • 1 tbsp lime zest
  • 1/4 cup agave
  • 1 tsp vanilla
  • 1/4 tsp salt
  • 1/4 cup water + more as needed
Instructions
Tart
  1. Add all ingredients to a food processor and process for a minute or two, or until everything comes together into a sticky ball.
  2. Press the processed tart ingredients into a baking dish/pan (I used an 8×8 dish, but an actual tart pan would work better!). Refrigerate for at least 30 minutes.
Cashew Cream
  1. Add all ingredients into a food processor or high speed blender and process/blend until smooth and creamy, adding more water, as needed.
  2. Pour cashew cream over tart crust and smooth it out. Add a bit of lime zest on top, and refrigerate for another 30 minutes before cutting into bars/squares and serving.
3.2.2310


Filed Under: Dessert, Recipes Tagged With: gluten free, oil free, pies and tarts, raw, soy free, squares and bars

Vegan Poutine That Will Knock Your Socks Off

May 4, 2014 4 Comments

Vegan-Poutine

This is one of my favourite comfort foods. When I’m having a bad day, I don’t want a bowl of salad. I want a big plate of fries, smothered in gravy and cheese.

I rarely eat this way, but when I do, I don’t scrimp.

Homemade-Vegan-Poutine

This vegan poutine is really simple, mostly because I cheat by using vegan cheese shreds. The only thing I have to make myself are the fries and gravy.

Which, thankfully, are very, very easy.

Poutine-Vegan

So, if you’re having a bad day, dig in to a plate of vegan poutine. And enjoy every scrumptious minute of it. Then – start eating healthy again immediately afterward!

Vegan Poutine That Will Knock Your Socks Off
Recipe Type: Snacks
Author: Vegan Insanity
Prep time: 15 mins
Cook time: 20 mins
Total time: 35 mins
Serves: 2-4
Easy vegan poutine!
Ingredients
  • Fries
  • 2 large or 3 medium russet potatoes, cut unto wedges or thin strips
  • 2 tbsp olive oil
  • salt & pepper, to taste
  • Gravy
  • 3 tbsp vegan butter (I used Earth Balance)
  • 2 tbsp flour (I used whole wheat)
  • 2 cups vegetable broth
  • 2 tbsp yellow mustard
  • 2 tbsp soy sauce
  • Other Items
  • 1/2-1 cup vegan cheese shreds (I used Daiya mozzarella shreds)
Instructions
Fries
  1. Pre-heat your oven to 425F.
  2. In a large bowl, drizzle the olive oil over your fries, and mix together well. Sprinkle with a bit of salt and pepper.
  3. Arrange on a baking sheet and cook for about 20-30 minutes (depending on how thick you made your fries), turning once. Remove from oven once they are cooked and divide between 2-4 plates.
Gravy
  1. Heat a small pot over medium heat.
  2. Add in the vegan butter, and once it has melted add in the flour. Whisk together until no clumps remain, and cook for about 1-2 minutes.
  3. Add in the vegetable broth, mustard and soy sauce and whisk again.
  4. Let the gravy thicken for a few minutes.
Putting it all together
  1. On top of your cooked fries, add vegan cheese shreds, then pour the thickened gravy over top. Enjoy immediately.
3.2.2310


Filed Under: Recipes, Snacks & Appetizers Tagged With: lunch, nut-free, quick and easy, soy free

Quinoa & Black Bean Burger with Vegan Nacho Cheese Sauce

May 2, 2014 4 Comments

Black-Bean-Quinoa-Burger

Now that the weather is warming up (I hope!), I’ve been dreaming of burgers. Burgers of all kinds.

Last week, I decided to make them. Who cares if we were having a huge rain storm that day? Burgers were on the menu, and I was thrilled.

Especially because I was going to slather my burger in spicy vegan nacho cheese sauce. Mmmm, yummy.

Quinoa-Black-Bean-Burger-Vegan

I highly recommend wrapping your burgers in plastic wrap and sticking them in the fridge for an hour or so before you cook them, too. I found that this helped to keep the burgers together better than when I’ve made them before and not refrigerated them first.

Also, you don’t have to bake these in the oven. You can also throw them (gently!) on the barbecue, or fry them on the stove. Cook them however your heart desires. Any way you cook them, they turn out pretty awesome.

Quinoa-Black-Bean-Burger

I topped my delicious burger with vegan nacho cheese sauce, baby spinach, tomatoes and alfalfa sprouts and it was a magical combination. So good. But of course, use whatever you like on a burger!

Quinoa & Black Bean Burger with Vegan Nacho Cheese Sauce
Recipe Type: Dinner
Author: Vegan Insanity
Prep time: 40 mins
Cook time: 20 mins
Total time: 1 hour
Serves: 5-6
Ingredients
  • Nacho Cheese Sauce
  • 1 1/4 cups water
  • 1 cup raw cashews, soaked for at least 2 hours
  • 3 tbsp lemon juice
  • heaping 1/4 tsp paprika
  • heaping 1/2 tsp onion powder
  • heaping 1/2 tsp garlic powder
  • 1 1/2 tsp salt
  • 1 large roasted red pepper
  • 1/4 cup nutritional yeast
  • Quinoa & Black Bean Burger
  • 1 flax egg (1 tbsp ground flax seed + 3 tbsp water)
  • 1 1/2 Cup Cooked Black Beans (if using canned beans, rinse & dry them first)
  • 1/4 cup uncooked quinoa
  • 1/2 cup water
  • 1/2 cup bread crumbs
  • 1/4 cup bell pepper, minced (I used red)
  • 2 tbsp onion, minced
  • 1 large garlic clove, minced
  • 1 tsp cumin
  • 1/2 tsp salt
  • 1 tsp hot sauce
  • Burger Ingredients
  • 5-6 burger buns
  • Toppings of your choice
Instructions
Nacho Cheese Sauce
  1. Add all ingredients to a food processor or high-powered blender and process/blend until smooth,
  2. Pour mixture into a medium pot over medium heat and warm it up for about 10 minutes, stirring constantly.
Quinoa & Black Bean Burger
  1. Pre-heat your oven to 400F.
  2. Whisk together the ground flax seed and water for your flax egg. Set aside.
  3. Bring the quinoa and water to a boil in a small pot, then cover and simmer for about 12 minutes, or until the quinoa is cooked. Set aside.
  4. Mash up the black beans in a bowl, using a fork. Don’t use a food processor because I’ve found this to make the burgers difficult to form into patties. You don’t have to mash every last bean, but do your best.
  5. In the bowl with the black beans, add in the bread crumbs, minced bell pepper, minced onion, minced garlic, cumin, salt, hot sauce, cooked quinoa and your flax egg. Mix together with your hands and them form into patties. You should be able to get 5-6 burgers, depending on how large you make them.
  6. Place your burgers on a baking sheet with a non-stick mat or parchment paper. Cook for about 10 minutes, or until browned on the bottom, then flip and cook another 10-15 minutes, or until browned on both sides and cooked through.
Putting it All Together
  1. Put your burger on a bun, top with vegan nacho cheese sauce and your choice of toppings (I used alfalfa sprouts, baby spinach and tomatoes).
Notes
*You can store any extra nacho cheese sauce in a mason jar in the fridge for up to 5 days. Simply re-heat it on the stove.
3.2.2708


Filed Under: Burgers, Recipes Tagged With: beans and legumes, dinner, lunch, oil free, quinoa, soy free

Homemade Peanut Butter in Minutes

April 30, 2014 Leave a Comment

Homemade nut butters have got to be one of the easiest things to make, ever. With only 1 ingredient, you can have delicious, creamy almond, peanut, cashew… any type of nut butter you desire, in just minutes.

Vegan-Peanut-Butter

Skip the store-bought stuff that is loaded with junk on top of more junk. Homemade nut butter is where it’s at.

Not only is it easy to make, and delicious, but it’s also way, way cheaper than buying it from a grocery store.

Peanut-Butter-Vegan

In our house, we go through a ton of peanut butter every week. Our 2 kids eat it almost daily, we have it in oatmeal, in smoothies, and in a lot of baked goods that I whip up. That means I always need to have peanuts on hand to make delicious homemade peanut butter at least twice each month.

Homemade-Peanut-Butter

I use either my KitchenAid food processor or the Twister Jar for our Blendtec blender to make my nut butters (I used the food processors for the peanut butter in these photos).

Both of them work really great for peanut butter, but I prefer the Twister Jar because it usually gets the peanut butter much smoother. If you like a chunkier peanut butter, you can just use a food processor.

When you make this peanut butter, the peanuts will go through various stages:

  • Crushed peanuts
  • Fine peanut powder
  • Peanut paste
  • Peanut butter dough
  • Chunky peanut butter
  • Smooth peanut butter

Once it’s done, it will be pretty thin because of the warmth from the food processor/blender, but let it sit in the fridge for a few hours and it will thicken up.

Homemade Peanut Butter in Minutes
Recipe Type: Condiments
Author: Vegan Insanity
Prep time: 7 mins
Total time: 7 mins
Serves: 1 1/2 cups peanut butter
Homemade peanut butter in no time flat! Easy, delicious and inexpensive. What could be better?
Ingredients
  • 2 cups of peanuts (I used raw & unsalted, then roasted them in the oven for about 5 minutes and allowed to cool)
  • 1/2 tsp salt (optional)
  • 1 tbsp coconut sugar (optional)
Instructions
  1. All peanuts to your food processor or blender, the process/blend until it reaches the smoothness you like, stopping to scrape the sides of the canister if necessary. For me (I like very smooth peanut butter), it took about 7 minutes in the food processor.
  2. Add in the salt & coconut sugar, if desired, and pulse a few times to incorporate.
3.2.2310


Filed Under: Dips, Spreads, Sauces, Recipes Tagged With: gluten free, nut butters, oil free, quick and easy, soy free

  • « Previous Page
  • 1
  • …
  • 6
  • 7
  • 8
  • 9
  • 10
  • …
  • 12
  • Next Page »

I'm Cassie - vegan food lover and animal rights activist. I live in Vaughan, Ontario, right near Toronto, with my husband, our 2 kids, 3 cats, and a dog that thinks he's a cat, too. I love to cook and share delicious vegan food with everyone I know. MORE →


Top 10 Posts

  • Super Simple Vegan Pad Thai
  • Vegan Cauliflower Mac & Cheese
  • Vegan Veggie & Black Bean Enchiladas
  • Zucchini Fritters with Vegan Sour Cream
  • How to Make Vegan Ricotta Cheese
  • 30 Tasty Vegan Lunch Ideas
  • 3 Ingredient Vegan Gnocchi
  • Best Ever Vegan Fried Rice with Scrambled Tofu
  • Quinoa & Chickpea Tabbouleh Salad
  • 20 Delicious Vegan Dinner Ideas
Top 10 Vegan Cookbooks

Copyright © 2025 · Genesis Framework by StudioPress · WordPress · Log in