Vegan Recipes from Cassie Howard

Vegan Insanity >> Vegan recipes that are delicious and easy to make. Plus, kitchen, cooking & shopping tips!

  • Home
  • About
    • Inside My Vegan Pantry
    • My 1 Year Vegan Anniversary
    • How I Got Over My Cheese Addiction
  • Recipes
    • Breakfast
    • Lunch
    • Dinner
    • Dessert
    • Snacks/Appetizers
  • Resources
    • Is it Expensive to be Vegan?
    • Top 10 Kitchen Tools
    • Top 10 Cookbooks
    • Vegan Picks
    • How-to Guides
    • Cooking Tips
    • Recipe Ideas
  • Contact

3 Ingredient Vegan Gnocchi

October 29, 2014 15 Comments

Gnocchi-Pasta-VeganThe first time I ever tried gnocchi was 2 years ago. I was browsing Pinterest (’cause duh, what else would I be doing with my time?) and came across this mysterious dish called “gnocchi”. Pasta made out of potatoes and flours.

Pu-lease. I am too sophisticated for that.

But I checked out the recipe anyway. I’m inquisitive like that. It looked easy (ha!) and the photos were mouth-watering so I thought I’d give it a try for dinner the next night when my best friend was coming over. Best friends forgive you when you mess up new recipes.

Vegan-GnocchiBut wouldn’t you know it – my friend, who is Italian (!!!), actually helped me make the gnocchi that night because her grandmother had taught her. We had her granny on speed-dial during the whole process, and every time we got stuck on something (this recipe was supposed to be EASY, you guys!), we’d give her a ring, she’d sigh at our lack of gnocchi knowledge, and proceed to tell us what to do next.

After 3 hours (OMG 3 HOURS MAKING “EASY” GNOCCHI), we were done. Starving, exhausted, but so proud of ourselves! It was one of the best meals I’ve ever eaten.

Gnocchi-VeganAnd then I had to go and become vegan. And so I can’t make Italian granny’s recipe anymore because “the eggs are important”. I think she’d lose her mind if I asked her “would flax eggs work”. And I can’t have a little old Italian lady hating me, so let’s avoid asking her that, mmkay?

But then recently I really, really wanted gnocchi. It came out of nowhere. You know when you’re in the store and you see the most beautiful dragonfruit ever and even though you’ve never had dragonfruit before, you just want to dig right in, right there in the middle of the grocery store.

THAT. That right there.

Homemade-Vegan-GnocchiImagine that feeling times infinity and that’s how I felt about gnocchi last week. For two days straight, it was all I could think about. Could I use flax eggs? (Shut up, brain!) Could I just eliminate the eggs altogether? What was I going to do? How could I make vegan gnocchi that actually tasted good (and didn’t take 3 hours to make – ’cause no, thanks – not gonna happen again)?

Homemade-Gnocchi-Vegan

Eventually, I got so desperate that I just started throwing ingredients into a bowl. Flour all over my shirt, in my hair, and mashed potatoes stuck to every surface in my kitchen. But did I care? Nuh-uh. I was making gnocchi!

With a bit of trial and error, I managed to make the most delicious, perfect little gnocchi friends I’ve ever tasted. I even pat myself on the back, I was so proud. And then I ate my way through that pile of gnocchi in no time flat. OMGOSHHHHHH I MISS YOU, GNOCCHI!

Vegan-Gnocchi-Pasta

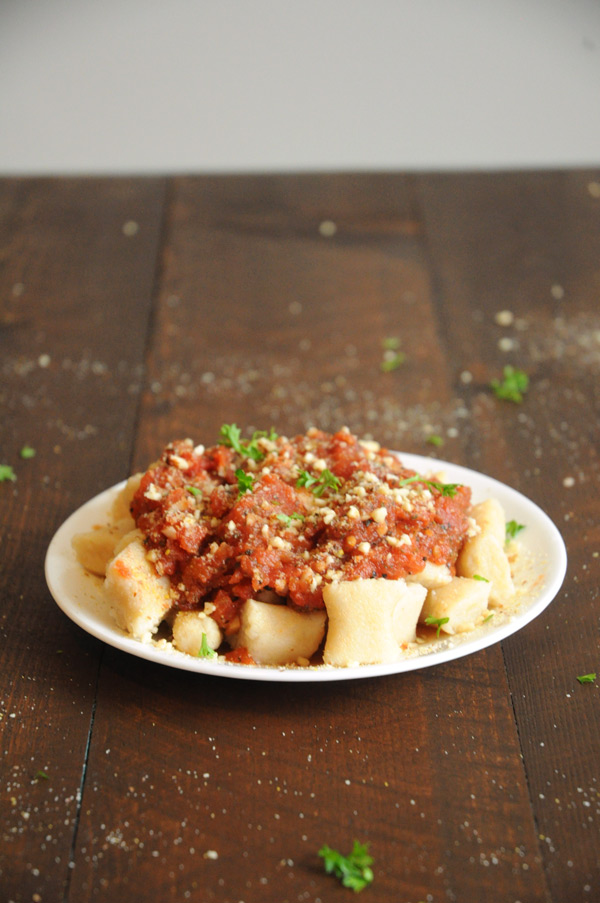
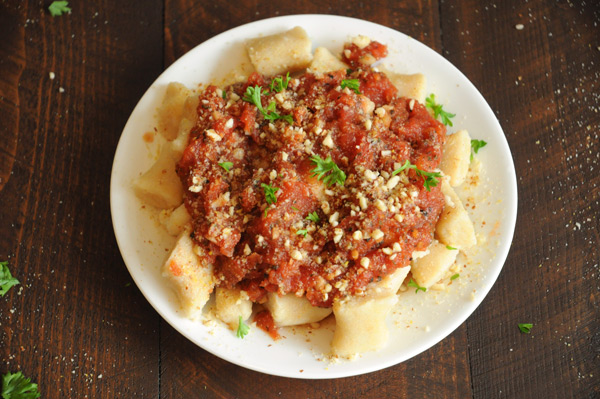
Not only is this gnocchi easy to make, it also uses just 3 ingredients. What?! Yes. 3. As in 1, 2, 3. Why do Italian grandmother’s have to make gnocchi so complicated? The quicker I can get gnocchi in my face the better, and this 2-ingredient recipe is my new go-to when I’m craving pasta pillows for dinner.

Homemade Vegan Gnocchi
Recipe Type: Entree
Author: Vegan Insanity
Prep time: 5 mins
Cook time: 2 hours 35 mins
Total time: 2 hours 40 mins
Serves: 4
Ingredients
  • 6 medium Russet potatoes
  • 3 cups kamut flour (or all-purpose)
  • 1 tsp salt
Instructions
  1. Preheat oven to 375F. Poke your potatoes with a fork and place on a large baking sheet. Bake for about 1 hour, or until a knife can be inserted into the middle of the potato easily.
  2. Slice the potatoes down the middle lengthwise and allow to cool for about 5 minutes.
  3. With a clean kitchen towel, grab hold of one of the potatoes and scoop the flesh out. Repeat with remaining potatoes.
  4. Pass your potato flesh through a potato ricer and place it all on a clean surface in your kitchen (the counter, the table, etc.).
  5. Gently spread out the potatoes on your surface and start sprinkling the flour on top, about a cup at a time. Cut the flour into the potatoes with a large spatula. Once the flour is absorbed, add another cup of flour, repeat and add 1/2 cup of flour and cut it in, as well. If you need the final 1/2 cup flour, add it, and cut it in. If you don’t need it, just leave it out. You should be able to form the dough into a large disk.
  6. Dust with flour and then wrap your disk in plastic wrap and allow to sit at room temperature for about 45 minutes.
  7. Cut a chunk of the dough off of the disk and roll it until it is about 1/2 inch thick. Cut the roll into 1-inch pieces. Repeat with the remaining dough.
  8. Heat a large pot of water over high heat. Once the water is boiling, add 1 tsp salt, then add a bunch of the gnocchi (do this in batches – don’t over-crowd them or they won’t cook properly). They should sink to the bottom and then float to the top when they are done (about 2-3 minutes).
  9. Serve with marinara, [url href=”http://www.veganinsanity.com/recipes/vegan-parmesan-cheese/” target=”_blank”]vegan parmesan cheese[/url] and fresh basil or parsley.
3.4.3177


Filed Under: Entrees, Recipes Tagged With: dinner, nut free option, oil free, potatoes, soy free

Homemade Peanut Butter Cups

October 8, 2014 Leave a Comment

Peanut-Butter-Cups-VeganHalloween is just around the corner and the kid in me is more excited than I should probably admit. I get a little decoration-happy over here!

It’s a shame I can’t partake in trick or treating anymore. Not just because I’m a MOM and I’m pretty sure it’s a no-no to beg for candy door-to-door when you’re almost thirty, but also because – have you SEEN the crap people hand out on Halloween? It’s like they’re trying to kill those precious little children.

PB-Cups-in-TinEverything is loaded with sugar, loaded with salt, and loaded with a bunch of ingredients that should never go into your body ever, ever, ever (I’m lookin’ at you, corn syrup!).

Homemade-Vegan-Peanut-Butter-CupsI let my kids go trick or treating, but only because I don’t want them to feel left out. I dump a good 75% of their candy into the trash when they go to bed, and honestly, they don’t miss it.

Vegan-Peanut-Butter-CupsBut I miss it! Before I switched to a vegan diet, I would rummage through my kids’ Halloween bags and eat their Coffee Crisp, Kit Kat, Doritos and Reese Peanut Butter Cups. Now, I have to look at those treats lovingly and then just toss them away. Which is probably a good thing, but I digress…

Homemade-Peanut-Butter-CupsThis year, I decided that if I was going to survive another year of watching my kids eat my favourite non-vegan treats from afar, I was going to need some treats of my own – like these peanut butter cups.

Vegan-Homemade-Peanut-Butter-CupsWith only 3 ingredients and less than 15 minutes of time, this is probably one of the easiest recipes ever. If you can even call it a recipe.

Peanut-Butter-CupsHello chocolate, meet peanut butter.

Homemade Peanut Butter Cups
Recipe Type: Snacks
Author: Vegan Insanity
Prep time: 15 mins
Total time: 15 mins
Serves: 12
Ingredients
  • 1 cup dairy-free chocolate chips (I used Enjoy Life brand)
  • 1/2 cup peanut butter (store-bought or homemade)
  • Kosher salt (optional)
Instructions
  1. Add chocolate chips to a microwave-safe bowl and heat for about 2 minutes, stirring every 45-60 seconds, until melted. Stir until smooth.
  2. Add paper or silicone liners to a large muffin pan. Add about 1 tbsp melted chocolate to the bottom of each liner. Freeze for about 10 minutes, or until the chocolate has hardened.
  3. Add about 1 tbsp peanut butter on top of the hardened chocolate (you may need to spread it out a bit), then add another 1-2 tbsp melted chocolate on top, making sure to cover the peanut butter.
  4. Sprinkle each peanut butter cup with a bit of kosher salt, then put the pan back in the freezer for another 10 minutes or so, until hardened.
  5. Store in the refrigerator (when you want to eat one, remove it from the fridge and allow to come to room temperature).
3.2.2807


Filed Under: Dessert, Recipes Tagged With: chocolate, gluten free, oil free, quick and easy, soy free

Apple Pie Smoothie

October 7, 2014 Leave a Comment

Apple-Pie-SmoothieSo I woke up the other morning with the desire to eat pie. Apple pie.

I must have been dreaming about pie or something, because I woke up, with droll all over my face, ready to bake me a pie for breakfast.

But then I came to my senses. “Pie isn’t for breakfast, silly!”, I said to myself.

Apple-Pie-Smoothie-VeganBut I still craved apple pie. So what did I do? I made a smoothie of course! I normally have a green smoothie in the morning, but since my apple pie craving was SO SO STRONG, as in, MUST HAVE IT NOW, I went with a smoothie that tasted like apple pie.

I just threw a bunch of pie ingredients into a blender, added more liquid (duh), and let the blender whirl. And wouldn’t you know it? This smoothie tasted just like apple pie! Without the delicious flaky crust, of course.

But still – YUM.

Easy-Vegan-Apple-Pie-SmoothieI was drinking apple pie! From a glass! In the morning!

I’m such a rebel.

Vegan-Apple-Pie-SmoothieNow you can be a rebel, too. Go ahead, drink some pie.

Apple Pie Smoothie
Recipe Type: Smoothie
Author: Vegan Insanity
Prep time: 10 mins
Total time: 10 mins
Serves: 2
Ingredients
  • 1 large apple, sliced (I used a honeycrisp apple)
  • 1 large banana
  • 1 1/2 cups non-dairy milk (I used almond milk)
  • 1 large date, pitted
  • 1/2 tbsp chia seeds
  • 1/2 tsp cinnamon
  • 1/4 tsp nutmeg
  • 3 or 4 ice cubes
Instructions
  1. Add all ingredients to a high speed blender and blend until smooth!
Notes
Use a nut-free non-dairy milk to make this recipe nut-free.[br]Use a non-dairy milk other than soy milk to make this recipe soy-free.
3.2.2807


Filed Under: Breakfast, Recipes Tagged With: gluten free, nut free option, oil free, quick and easy, raw, smoothies

Spirulina Protein Power Bites

September 25, 2014 4 Comments

I spotted it in the store a few months ago. It stood out and called my name: SPIRULINA.

Spirulina

I had heard about the almighty spirulina before, but I had never seen it at the store. Until THAT DAY. That day when I decided to look a little closer for this superfood that is such a rich source of calcium and iron.

And there it was. Sitting on a shelf. Calling my name.

Spirulina-Balls-Recipe

So I bought it. And it sat in my kitchen cupboard for over 2 months without being opened once. I’m a procrastinator, what can I say?

Spirulina-Balls

After seeing this full jar of spirulina at least 5 million times, I finally decided enough was enough, and set out to make something THAT DAY.

Spirulina-Balls-Vegan

It was a green smoothie. And it was delicious. I’ve made that smoothie a bunch of times now and even my picky kids will drink it!

But this is not that recipe.

Spirulina-Snack-Balls

I was feeling ambitious a few weeks ago, and decided to use spirulina to make something other than green smoothies, so I went with these adorable little bites of goodness.

And it worked – they are absolutely delicious, and healthy and everything I love in a snack.

But man are they ever GREEN. I stained my white t-shirt while making these, so if you plan to make them, I strongly recommend black everything!

Spirulina-Snack-Bites


Spirulina Protein Power Bites
Recipe Type: Snack
Author: Vegan Insanity
Prep time: 15 mins
Total time: 15 mins
Serves: 15-20
Ingredients
  • 1 cup dates
  • 1/2 cup raisins or dried cranberries
  • 3/4 cup almonds
  • 2 tbsp spirulina
  • 3 tsp lemon juice
Instructions
  1. Add all ingredients to a food professor and process until well combined.
  2. Roll into balls and store in the refrigerator for up to 2 weeks.
3.2.2807


Vegan-Spirulina-Balls

Filed Under: Recipes, Snacks & Appetizers Tagged With: oil free, quick and easy, raw, soy free

Big Vegan Taco Salad

September 16, 2014 5 Comments

Big-Vegan-Taco-Salad

Hello, my name is Cassie, and I’m still holding on to summer with all I’ve got. Will. Not. Let. It. Go.

Considering I’ve switched from shorts and t-shirts to pants and sweaters in less than a week, I think it’s safe to say that summer has abruptly just up and left me, without even saying goodbye.

Which just means YAY, FALL FOODS TIME! But it also means summer is gone, and also, much of my fave summer meals. Boo. So let’s give summer one last hurrah, shall we?

Vegan-Taco-Salad

This is a big, monster vegan taco salad that I whipped up on a whim the other day, hoping it would bring summer back to me (it didn’t), and it ended up being one of my most favourite salads that I made all summer.

It’s loaded with veggies, quinoa, vegan taco meat and a healthy drizzle of oh-so-good green sauce. It makes my tummy happy.

Big-Taco-Salad

I also added crushed up tortilla chips (Neil Brothers are THE BEST!) on top, because duh, that’s just obvious. It added a nice salty, crunchy flair to the dish. It also kinda sorta helped with getting my two picky kids to eat a meal full of VEGETABLES.

Goodbye summer, you will be missed! And please… let fall last awhile before old man winter comes along! Pumpkin EVERYTHING is calling my name…

The-Big-Vegan-Taco-Salad

Big Vegan Taco Salad
Recipe Type: Salad
Author: Vegan Insanity
Prep time: 20 mins
Total time: 20 mins
Serves: 1-2
Ingredients
  • Creamy Green Sauce
  • 1 cup raw cashews (soaked for at least 2 hours)
  • 1/4 cup unsweetened almond milk
  • 1/4 cup parsley (cilantro would work, too)
  • 2 tbsp lime juice
  • 1/2 tsp apple cider vinegar
  • 1/2 tsp onion powder
  • 1 medium garlic clove
  • 1/2 tsp sea salt
  • 1/4 tsp freshly ground black pepper
  • Taco Meat
  • 1 cup walnuts, soaked for at least 2 hours
  • 1/2 cup sun-dried tomatoes, soaked for at least 2 hours
  • 1/4 tsp garlic powder
  • 1/2 tsp cumin
  • 1/2 tsp salt
  • Pinch of cayenne pepper
  • Taco Salad
  • 4 cups chopped lettuce (I used mixed greens)
  • 2/3 cup cooked quinoa
  • 1/4 cup red onion, finely chopped
  • 1/4 cup corn
  • 1/4 cup cooked black beans
  • 1/4 cup cherry tomatoes, sliced in half
  • 1/2 cup salsa
  • Handful of crushed tortilla chips (optional)
Instructions
Creamy Green Sauce
  1. Add all ingredients to a high-powered blender or food processor and blend/process until smooth and creamy. Set aside.
Taco Meat
  1. Drain walnuts and sun-dried tomatoes.
  2. Add all ingredients to a food processor and process until combined, and still a bit chunky. Set aside.
Taco Salad
  1. On one large plate or 2 medium-sized plates, add your lettuce, quinoa, red onion, taco meat, corn, the black beans, cherry tomatoes and salsa.
  2. Drizzle on a heavy amount of dressing, sprinkle with crushed tortilla chips, if desired, and dig in! If you have any left over, the dressing should last in the fridge for 4-5 days.
Notes
*Make this recipe gluten-free by omitting the tortilla chips (or using a gluten-free variety).
3.2.2807


Filed Under: Recipes, Salad Tagged With: beans and legumes, dinner, gluten free, lunch, oil free, quinoa, soy free

Perfect Peach & Oat Breakfast Bars

September 9, 2014 5 Comments

Peach-Oat-BarsPeach. Oatmeal. Dates.

Yummy. Yummy. Yummy.

Peaches have always been one of my favourite fruits. I put it in oatmeal, in banana ice cream, in crepes, and of course – directly in my mouth. So sweet and juicy. No other stone fruit compares to the deliciousness that is peaches!

When summer comes, I buy baskets and baskets of them at a time, and I still always seem to eat them all up within days. I just can’t get enough.

And now that summer has come to an end, that means my lovely peaches are making their way out of my kitchen soon. So sad. But peaches that aren’t in season are even sadder, so I rarely eat peaches during any season other than summer.

Peach-Oat-Bars-Vegan-SquaresAre you drooling yet?

And with just a tablespoon of maple syrup in the entire pan, these are a healthy breakfast bar that any peach lover would enjoy!

Peach-Oat-Bars-VeganThese bars are a bit crumbly, so I suggest letting them cool completely, and then keeping them in the fridge and eating them cold or at room temperature, not warmed.

If you don’t have access peaches, you can replace them with another fruit of your choice, such as strawberries or blueberries. You may have to adjust the amount of fruit added, though. Enjoy!

Vegan-Peach-Oat-Bars

Perfect Peach & Oat Breakfast Bars
Recipe Type: Breakfast
Author: Vegan Insanity
Prep time: 10 mins
Cook time: 25 mins
Total time: 35 mins
Serves: 9
Ingredients
  • 2 cups rolled oats*
  • 1/4 cup chopped dates
  • 2 tbsp slivered almonds
  • 1 tbsp chia seed
  • 1 tsp baking powder
  • 1 tsp cinnamon
  • 3/4 cup + 2 tbsp non-dairy milk (I used almond milk)
  • 1 tsp vanilla
  • 1 1/4-1 1/2 cups chopped, peeled peaches
Instructions
  1. Preheat oven to 350F. Line a 8×8 inch baking dish with parchment paper, leaving a bit of overhang.
  2. In a large bowl, combine oats, chopped dates, chopped almonds, chia seeds, baking powder, and cinnamon.
  3. In a medium bowl, combine non-dairy milk, vanilla and peaches. Stir the wet ingredients into the dry ingredients until combines, making sure to not mush the peaches too much.
  4. Spread into your baking dish and bake for about 20-25 minutes.
  5. Remove pan from oven and allow to cool for at least 20 minutes. Remove from pan by lifting up the parchment paper. Place on a large cutting board and cut into 9 squares.
Notes
*Use gluten-free oats to make this dish gluten-free.
3.2.2807


Filed Under: Breakfast, Recipes Tagged With: gluten free, oil free, quick and easy, soy free, squares and bars

How to Make Homemade Almond Milk

September 1, 2014 3 Comments

Homemade-Almond-Milk

Homemade almond milk. Is there anything better?

The correct answer is yes. Chocolate. But other than chocolate? NOPE!

And guess what? Homemade almond milk is one of the easiest things you can make yourself! No more processed milk from the store, for you. Yippie!

Plump-Almonds

First, start off with a bowl of delicious, plump almonds. To get them nice and plump like this, soak them in water overnight, or at least 8 hours.

Soaking your almonds allows you to get the almond milk smoother. Plus, soaked almonds are easier to digest! So go get soaking!

Almonds-in-Blender

Add your soaked nuts to a blender with 4 cups of filtered water. Blend for about 3 minutes, or until smooth, and white, and creamy, and omgosh so good.

Almond-Milk-in-Blender

Like this. Pretty, right? Yes – milk can be pretty. Especially this almond milk.

See how well the blender was able to do with the soaked almonds?

Pouring-Almond-Milk

Although the mixture is smooth, you still want to pour the milk through a nut milk bag to remove any sediment. I use this one that I bought off Amazon for under $10. Worth. Every. Penny.

Squeezing-Almond-Milk

Squeeze, squeeze, and squeeze some more, until no more milk is seeping through the bag. Set aside the almond pulp that is left inside the bag (refrigerate and use in smoothies or dry it out in the oven to make almond flour).

Add the milk back to the blender and add the agave, vanilla and cinnamon. Blend for another minute or so.

Almond-Milk-Homemade

Ta-da! Homemade almond milk in minutes (not including soaking time)! I told you it was easy. Pour into a large air-tight jar and refrigerate for up to 5 days.

And in case you were wondering – YES, it is delicious. I like it 1000x more than the store-bought stuff.

Next up on my list – homemade chocolate almond milk!

Vegan-Almond-Milk

How to Make Homemade Almond Milk
Recipe Type: Homemade Milk
Author: Vegan Insanity
Prep time: 15 mins
Total time: 15 mins
Serves: 8 cups
Ingredients
  • 1 cup raw almonds, soaked for at least 8 hours
  • 4 cups filtered water
  • 1 tbsp agave
  • 1/2 tsp vanilla
  • 1/4 tsp cinnamon
  • 1/4 tsp salt
Instructions
  1. Drain and rinse your almonds, then add to a blender with 4 cups of water.
  2. Blend for about 3 minutes, or until smooth.
  3. Over a large bowl, place a nut milk bag, and then pour the almond & water mixture through the nut milk bag.
  4. Gently squeeze the bottom of the nut milk bag, releasing the almond milk into the bowl. Keep doing this until all of the milk has been released and you are left with a big lump of almond pulp in the bag (set that aside and use in smoothies or dry it out in the oven to make almond flour).
  5. Rinse out your blender and blender lid, and add the almond milk back into the blender, along with the agave, vanilla and cinnamon. Blend again for another minute or so.
  6. Pour almond milk into a large glass jar and refrigerate for up to 5 days.
Notes
*Make sure you shake up the almond milk before using, as it will separate while sitting.
3.2.2708


Filed Under: How-to Guides Tagged With: gluten free, oil free, quick and easy, raw, soy free

Vegan Caesar Salad with Homemade Croutons

August 22, 2014 1 Comment

I have never met a Caesar salad I didn’t like, but this recipe – this recipe is the best. BEST Caesar salad recipe ever, ever, ever.

That is no lie. It’s the absolute best vegan Caesar salad I have made, and every Caesar lover that has tried it agrees.

Vegan-Caesar-Salad

The dressing is smooth and creamy, perfectly coating every piece of romaine lettuce. With just a hint of liquid smoke, the dressing gets that bacon taste that traditional Caesar salad has – without using bacon. Yippie!

Liquid smoke, where have you been all my life?

Caesar-Dressing

I like to keep my Caesar pretty simple, with dressing and homemade croutons, but you can definitely add other things, such as meat substitutes, sprouts, chickpeas, or lentils.

Vegan-Caesar-Dressing

If you’re a big Caesar salad lover like me – you MUST try this recipe! Then report back and tell me what you thought!

Also, some big news ’round these parts: this is my 100th post on the site! 100 posts since I first started blogging about delicious vegan food in March of this year. YAY!

Thank you so much for reading. I love sharing my passion for vegan food, and I appreciate you for reading these words that I write, scoping out the photos that I take (that are nowhere near as awesome as my favourite food bloggers photos are), and trying out the recipes that I create. I’m honoured that you visit me each week!

Vegan Caesar Salad with Homemade Croutons
Recipe Type: Salad
Author: Vegan Insanity
Prep time: 15 mins
Total time: 15 mins
Serves: 2-4
Ingredients
  • Dressing
  • 1 3/4 cup cashews, soaked for at least 2 hours, then drained
  • 1/2 cup water
  • 2 tbsp nutritional yeast
  • 2 tbsp lemon juice
  • 1 tbsp tamari
  • 1 tsp liquid smoke
  • Salt & pepper, to taste
  • Salad
  • 3 cups chopped romaine lettuce
  • 1/2 serving Caesar dressing
  • [url href=”http://www.veganinsanity.com/how-to/homemade-croutons/”]Homemade croutons[/url]
Instructions
Dressing
  1. Add all ingredients into a high-powered blender or food processor and blend/process until smooth and creamy. Set aside.
Salad
  1. Add lettuce to a large bowl and add 1/2 of the vegan Caesar dressing. Mix very well.
  2. Divide salad among bowls and top with croutons. Enjoy!
3.2.2708

Caesar-Dressing-Vegan

Filed Under: Recipes, Salad Tagged With: dinner, lunch, oil free, quick and easy, soy free

  • 1
  • 2
  • 3
  • 4
  • Next Page »

I'm Cassie - vegan food lover and animal rights activist. I live in Vaughan, Ontario, right near Toronto, with my husband, our 2 kids, 3 cats, and a dog that thinks he's a cat, too. I love to cook and share delicious vegan food with everyone I know. MORE →


Top 10 Posts

  • Super Simple Vegan Pad Thai
  • Vegan Cauliflower Mac & Cheese
  • Vegan Veggie & Black Bean Enchiladas
  • Zucchini Fritters with Vegan Sour Cream
  • How to Make Vegan Ricotta Cheese
  • 30 Tasty Vegan Lunch Ideas
  • 3 Ingredient Vegan Gnocchi
  • Best Ever Vegan Fried Rice with Scrambled Tofu
  • Quinoa & Chickpea Tabbouleh Salad
  • 20 Delicious Vegan Dinner Ideas
Top 10 Vegan Cookbooks

Copyright © 2025 · Genesis Framework by StudioPress · WordPress · Log in