Vegan Recipes from Cassie Howard

Vegan Insanity >> Vegan recipes that are delicious and easy to make. Plus, kitchen, cooking & shopping tips!

  • Home
  • About
    • Inside My Vegan Pantry
    • My 1 Year Vegan Anniversary
    • How I Got Over My Cheese Addiction
  • Recipes
    • Breakfast
    • Lunch
    • Dinner
    • Dessert
    • Snacks/Appetizers
  • Resources
    • Is it Expensive to be Vegan?
    • Top 10 Kitchen Tools
    • Top 10 Cookbooks
    • Vegan Picks
    • How-to Guides
    • Cooking Tips
    • Recipe Ideas
  • Contact

Easy Cheesy Vegan Quesadillas

May 15, 2014 4 Comments

Vegan-Quesedillas

I was craving a super quick lunch the other day. I had so many things on my to-do list, and making an elaborate lunch wasn’t one of them. I initially considered pasta, because it’s easy, filling and mighty delicious – but, I was out of pasta.

Dang.

So, I stared in my pantry for a few minutes and then I spotted the tortillas. Ding ding ding!

Cheesy-Vegan-Quesedillas

I almost always have soaked cashews in my refrigerator, since I cook with them a lot, and thankfully, I had some this day, and used them to make the yummy cashew cheese for this quick meal.

Easy-Vegan-Quesedillas

The only thing that took awhile was cooking 4 quesadillas, since they take about 5-8 minutes each. But other than that, this was an easy lunch to throw together, using ingredients I already had on hand.

I’d also like to mention that these vegan quesadillas are kid-approved (and that’s saying something, since my kids want to eat nothing but chocolate, bread, and plain pasta)!

Easy-Cheesy-Vegan-Quesedillas

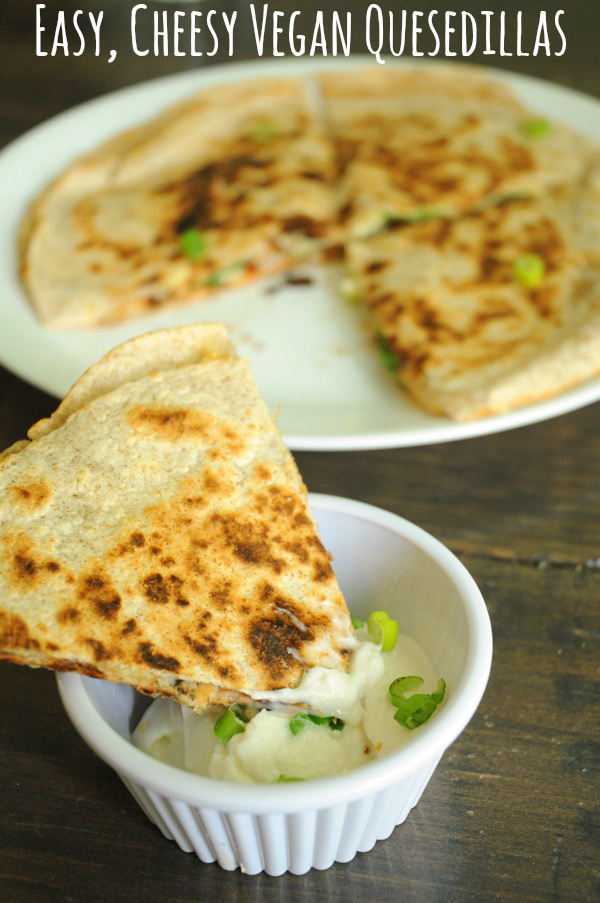
I used vegan sour cream to dip my quesadillas in, but you can also used mashed avocado (or guacamole!), hummus, vegan nacho cheese, or just eat them plain. No matter how you eat them – they are damn good. Try some for lunch today!

Easy Cheesy Vegan Quesadillas
Recipe Type: Appetizers, Snacks, Lunch
Author: Vegan Insanity
Prep time: 15 mins
Cook time: 30 mins
Total time: 45 mins
Serves: 4
Ingredients
  • Cashew Cheese
  • 1 1/2 cups raw cashews (soaked for at least 2 hours)
  • 1/4 cup water
  • 3 tbsp lemon juice
  • 2 1/2 tbsp nutritional yeast
  • 1 garlic clove
  • Salt & freshly ground black pepper, to taste
  • Quesadillas
  • 8 flour tortillas
  • 3/4 cup cooked black beans (if using canned, drain and rinse first)
  • 3/4 cup corn (I used frozen)
  • 1/3 cup black olives, sliced
  • 3/4 cup tomatoes, diced (I used 1 large beefsteak tomato)
  • 1/4 cup parsley, chopped
  • 3 tbsp green onions, chopped small
  • 1 large avocado, pitted and sliced
  • 1 tbsp coconut oil
Instructions
Cashew Cheese
  1. Add all of the cashew cheese ingredients into a food processor or high-speed blender and process/blend until smooth. Refrigerate until ready to use.
Quesadillas
  1. In a medium bowl, mix together the black beans, corn, olives, diced tomato and parsley. Set aside.
  2. Add a generous layer of cashew cheese to a tortilla, top with the black bean mixture, then cover with another tortilla, press down lightly, then set aside. Repeat with remaining tortillas.
  3. Heat a large pan over medium heat, add 1/2 tbsp oil, and add your quesadilla. Cook until the bottom of the quesadillas is golden brown (3-4 minutes), then flip and cook until the other side is golden brown. Repeat with remaining quesadillas.
  4. Plate your quesadillas, and sprinkle some green onions on top of each one. Serve with vegan sour cream, mashed avocado, or whatever else you like with your quesadillas.
3.2.2708


Filed Under: Recipes, Snacks & Appetizers Tagged With: beans and legumes, dinner, lunch, quick and easy, soy free

Healthy & Delicious Trail Mix Cookies

May 14, 2014 5 Comments

Healthy-Trail-Mix-Cookies

I was trying to come up with a way to get more nuts and seeds into my kids’ mouths, since they usually refuse to eat them unless they’re covered in chocolate.

I tried putting them in oatmeal, in smoothies, in cereal – anywhere I could sneak them in, but they always seemed to know, and they hated that I “tricked” them.

Trail-Mix-Cookies-Vegan

Even though I explained that they needed to eat their nuts and seeds in order to be healthy and get all of the nutrients these foods provided, they didn’t care.

They are kids, afterall. And kids don’t like it when you’re right and they’re wrong.

Trail-Mix-Cookies

I asked them how I could make them eat these seeds and nuts, and the only thing they agreed to try was if they were in cookies.

So, cookies it was. Of course, I didn’t want them to be loaded with sugar, so I loaded them up with lots of healthy options instead.

And a few chocolate chips. Because a few chocolate chips never hurt anybody.

Vegan-Trail-Mix-Cookies

And wouldn’t you know it – they ate the cookies! Which means they ate the seeds & nuts. Success!

The funny thing about this story is that they now ask for raw nuts on a regular basis. These cookies won them over! Thank you, trail mix cookies.

Adapted from Oh She Glows.

Healthy & Delicious Trail Mix Cookies
Recipe Type: Cookies
Author: Vegan Insanity
Prep time: 20 mins
Cook time: 14 mins
Total time: 34 mins
Serves: 24 cookies
Ingredients
  • 1 flax egg (1 tbsp ground flax + 3 tbsp water)
  • 1 cup oat flour (just take rolled oats and throw them in your food processor)
  • 1/2 cup almond flour (just take almonds and throw them in your food processor until they resemble a “crumb-y” flour)
  • 1/2 cup rolled oats
  • 1/2 cup sliced almonds
  • 1/4 cup coconut sugar
  • 1/4 cup shredded unsweetened coconut
  • 1/4 cup chocolate chips (or finely chopped chocolate)
  • 2 tbsp sunflower seeds
  • 2 tbsp sesame seeds
  • 2 tbsp chia seeds
  • 2 tbsp dried cranberries
  • 1 tsp cinnamon
  • 1/2 tsp salt
  • 1 1/2 tsp baking powder
  • 1/4 cup peanut butter
  • 1/4 cup coconut oil
  • 1/4 cup maple syrup or agave (I used maple syrup)
  • 1 1/4 tsp vanilla
Instructions
  1. Preheat oven to 350F and line a baking sheet with parchment paper or a baking mat.
  2. Mix together the ground flax and water in a small bowl and set aside for about 10 minutes.
  3. In a large mixing bowl, whisk together the rest of the ingredients, including the flax egg. Yes, add every last ingredient to your bowl!
  4. Scoop about 2 tbsp of the cookie “dough” and form into balls. Place them on your prepared baking sheet, and flatten slightly with your hand.
  5. Bake for 12-14 minutes, or until lightly browned on the bottoms. Allow to cool for at least 15 minutes before handling.
3.2.2310


Filed Under: Dessert, Recipes Tagged With: chocolate, cookies, quick and easy, soy free

How Long Does Fresh Produce Last + How Do I Store It?

May 13, 2014 4 Comments

When you eat a healthy vegan diet, it’s very common to have a refrigerator (and counter!) completely filled with fresh produce. This is a good thing.

The bad thing is that if you’re not careful in how you plan your meals, your produce can go bad on you in a short period of time. Since produce is fresh food, and not the processed crap you find on store shelves, it doesn’t last for months on end. Some produce lasts longer than others, while some will spoil soon after you purchase it.

Since I know this can be confusing (it was confusing to me just a few months ago!), I thought I’d make up this list to show you how long produce lasts. Note: These numbers are based on the date that you purchased the produce, assuming that the items you purchased are in excellent health and have not yet started to spoil.

Fresh Produce

Up to 3 days:

  • Artichokes – Store them in an air-tight plastic bag in the refrigerator.
  • Asparagus – Store them in the refrigerator in an upright jar, filled with 1-1 1/2 inches of water.
  • Avocados – Store them at room temperature, but avoid direct sunlight.
  • Beans – Store them in an air-tight plastic bag in the refrigerator.
  • Bok Choy – Store it in an air-tight plastic bag in the refrigerator.
  • Cherries – Store them in an air-tight plastic bag in the refrigerator.
  • Corn – Leave husks on corn on the cob and store uncovered in the refrigerator.
  • Delicate Herbs (Basil, Cilantro) – Store them in the refrigerator, in an air-tight plastic bag with a piece or two of paper towels in there with the herbs.
  • Mustard Greens – Store them in an air-tight plastic bag in the refrigerator.
  • Okra – Store it in an air-tight plastic bag in the refrigerator.
  • Peaches – Store them at room temperature.
  • Pineapple – Store it at room temperature to ripen, then refrigerate for 3-5 days. Cut up pineapple will last 3-4 days in the refrigerator.
  • Raspberries – Discard bruised or moldy berries before storing. Store in the refrigerator (top shelf), in a shallow container, covered with plastic wrap.
  • Strawberries – Discard bruised or moldy berries before storing. Store in the refrigerator (top shelf), in a shallow container, covered with plastic wrap.

Berries-Avocados

Up to 5 days:

  • Bananas (once ripe, they can last another 5 days in the refrigerator, just keep in mind that the skin will turn black) – Store at room temperature until ripe, then refrigerate, if needed.
  • Blackberries – Discard bruised or moldy berries before storing. Store in the refrigerator (top shelf), in a shallow container, covered with plastic wrap.
  • Cantaloupe (once ripe, they can last another 7-10 days in the refrigerator) – Store at room temperature until ripe, then refrigerate if needed. Once cut, cantaloupe lasts 3-4 days in the refrigerator.
  • Collard Greens – Store them in an air-tight plastic bag in the refrigerator.
  • Eggplant – Store it in the refrigerator, wrapped in plastic.
  • Green Onions – Wrap in plastic and store in the vegetable crisper of your refrigerator.
  • Honeydew Melon (once ripe, they can last another 5-7 days in the refrigerator) – Store at room temperature until ripe, then refrigerate if needed .Once cut, honeydew melon lasts 3-4 days in the refrigerator.
  • Kale – Store it in an air-tight plastic bag in the refrigerator.
  • Kumquats – Store them room temperature.
  • Leafy Herbs (Mint, Parsley) – Store them in the refrigerator, in an air-tight plastic bag with a piece or two of paper towels in there with the herbs.
  • Lettuce – Store it in the refrigerator in a loosely-closed plastic bag.
  • Mangoes – Store them at room temperature.
  • Mushrooms – Store them in a paper bag in the refrigerator.
  • Papaya – Store it at room temperature.
  • Persimmons – Store them at room temperature.
  • Radishes – Store them in an air-tight plastic bag in the refrigerator.
  • Swiss Chard – Store it in a loosely-closed plastic bag in the refrigerator.
  • Tomatoes – Store them at room temperature until ripe, then refrigerate for 2-3 days if needed.
  • Zucchini – Store in a loosely-closed plastic bag in the refrigerator.

Lettuce-Green-Onions

Up to 1 week:

  • Blueberries – Discard bruised or moldy berries before storing. Store in the refrigerator (top shelf), in a shallow container, covered with plastic wrap.
  • Clementines – Store them at room temperature.
  • Cucumber – Store it in an air-tight plastic bag in the refrigerator.
  • Grapefruit – Store it at room temperature.
  • Jalapeno – Store in a paper bag in the vegetable crisper of your refrigerator.
  • Kiwi – Store them at room temperature.
  • Oranges – Store them at room temperature.
  • Pears – Store them at room temperature.
  • Plums – Store them at room temperature.
  • Spinach – Store it in a loosely-closed plastic bag in the refrigerator.
  • Watermelon – Store it at room temperature.

Pears-Spinach

1 week or more:

  • Apples – Store them in the vegetable crisper refrigerator for up to 3 weeks.
  • Beets – Store them in a loosely-closed plastic bag in the refrigerator for up to 2 weeks.
  • Bell Peppers – Store them in an air-tight plastic bag in the refrigerator for up to 2 weeks.
  • Broccoli – Store it in a loosely closed plastic bag in the refrigerator.
  • Brussels Sprouts – Store them in a loosely closed plastic bag in the refrigerator.
  • Butternut/Acorn/Spaghetti Squash – Store it at room temperature (in a dark, cool area of 50F-60F) for up to 4 weeks.
  • Cabbage – Store it in a loosely closed plastic bag in the refrigerator.
  • Carrots – Store them in a loosely closed plastic bag in the refrigerator for up to 3 weeks.
  • Cauliflower – Store it in a loosely closed plastic bag in the refrigerator.
  • Celery – Wrap it tightly with aluminum foil and store  it in the refrigerator for up to 3 weeks.
  • Garlic – Store it in a cool, dark area for up to 2 months.
  • Leeks – Store them in a paper bag in your refrigerator.
  • Lemons – Store them in an air-tight plastic bag in the refrigerator for up to 2 weeks.
  • Limes – Store them in an air-tight plastic bag in the refrigerator for up to 2 weeks.
  • Onions (Except Sweet) – Store them in a cool, dark area for up to 2 months.
  • Parsnips – Store them in an air-tight plastic bag in the refrigerator for up to 3 weeks.
  • Pomegranates – Store them at room temperature for up to 2 weeks.
  • Pumpkin – Store it in a cool, dark area for up to 4 weeks.
  • Russet Potatoes – Store them in a cool, dark area for up to 2 weeks.
  • Sweet Potatoes – Store them at room temperature.
  • Turnips – Store them in an air-tight plastic bag in the refrigerator.
  • Woody Herbs (Rosemary) – Store them in the refrigerator, in an air-tight plastic bag with a piece or two of paper towels in there with the herbs.

Lemons-Pepper

I think I’ve covered all of the common produce here, but if I’ve missed something, please let me know and I will add it to the list!

Filed Under: How-to Guides Tagged With: groceries, tips and tricks

Our Menu Plan This Week

May 12, 2014 2 Comments

Pesto Pasta Photo
Pasta with Sunflower Seed Pesto & Nutritional Yeast – A quick & easy meal!

Every week, I create a menu plan for the week ahead. I’ve always found menu planning to be helpful, but especially when eating a vegan diet.

Sometimes I forget to make one, and those weeks are just awful. I stare into the fridge and whine that there’s “nothing to eat”, even though the fridge is packed full of deliciousness. It’s bad.

So – I menu plan every week (usually) to make things easier on myself. And it works. I promise.

Here is the menu plan for my family this week:

Breakfast:

  • Raw Triple Berry Crisp
  • Fruit Smoothie, Toast with Almond Butter x2
  • Stove Top Oatmeal with Nuts, Seeds & Fruit
  • Chickpea Omelet, Fruit
  • Bagel with Vegan Butter, Fruit Smoothie x2

Lunch:

  • World’s Best Vegan Pancakes, Fruit
  • Kung Pao Chickpeas
  • Couscous & Cauliflower Salad
  • Cashew Cheese Quesedillas
  • Leftovers x3

Dinner:

  • Thin Crust Pizza, Salad
  • Crispy Coconut Tofu with Spicy Pineapple Cream Sauce, Kale & Quinoa Salad
  • Mexican Quinoa
  • Vegan Enchiladas
  • Roasted Cauliflower & Chickpea Tacos
  • Spicy Vegan Mac & Cheese
  • Raw Taco Salad

Snacks/Dessert:

  • Broccoli Cheese Puffs
  • Chocolate Coconut Oatmeal Cookies
  • Fruit
  • Raw Nuts
  • Hemp & Hazelnut Protein Bars
  • Loaded Potato Nachos
  • Pretzels

What’s on your menu this week?

Filed Under: Menu Plans Tagged With: weekly menu plans

Super Cheesy Vegan Pesto Pasta

May 12, 2014 14 Comments

Cheesy-Pesto-Pasta

I have one of the easiest recipes ever to share with you today.

Easy and tasty – the perfect combo, don’t you think?

Pesto-Pasta

I was craving pasta not long ago, but I wasn’t in a very creative mood, so I looked online for some inspiration.

Pesto pasta kept popping up everywhere, and since I had just made a batch of it the day before for a salad, that’s what I decided to make. I was excited to have such a simple dish for lunch. Cook pasta, add prepared pesto, eat. Easy.

But, as I reached into the fridge to grab the pesto, I noticed the jar of nacho cheese sauce that I’d made for our quinoa & black bean burgers  a few days prior.

Hmmm – “do I dare?”, I asked myself.

Cheesy-Vegan-Pesto-Pasta

And dare, I did.

I warmed up the nacho cheese, then added it to the cooked pasta, along with the pesto. I mixed it all together, crossed my fingers, stuffed a bunch of pasta in my face..

and just about died from the deliciousness.

The spicy nacho cheese with the cool pesto was a surefire winner!

Lunch was awesome that day. Which reminds me, I need to make another batch of pesto…

Vegan-Pesto-Pasta

Super Cheesy Vegan Pesto Pasta
Recipe Type: Pasta
Author: Vegan Insanity
Prep time: 20 mins
Cook time: 10 mins
Total time: 30 mins
Serves: 4
Creamy, cheese, pesto-y. This dish has it all! Serve it up for lunch, dinner – heck, why not breakfast? You’ll find it hard not to stuff your face with this cheesy pesto pasta, regardless of what time of day it is!
Ingredients
  • Pesto
  • 1 1/2 cups fresh basil
  • 1/3 cup extra virgin olive oil (or hemp oil)
  • 1 cup pine nuts*
  • 4 medium garlic cloves
  • 1/3 cup nutritional yeast
  • 1/2 teaspoon salt
  • 1/2 teaspoon freshly ground black pepper
  • Nacho Cheese
  • 1 1/4 cups water
  • 1 cup raw cashews, soaked for at least 2 hours
  • 3 tbsp lemon juice
  • heaping 1/4 tsp paprika
  • heaping 1/2 tsp onion powder
  • heaping 1/2 tsp garlic powder
  • 1 1/2 tsp salt
  • 1 large roasted red pepper
  • 1/4 cup nutritional yeast
  • Pasta
  • 3 cups pasta noodles of your choice (I used spelt spiral noodles)
Instructions
Pesto
  1. Add all ingredients to a food processor and process until just a little bit chunky. Set aside.
Nacho Cheese
  1. Add all ingredients to a food processor or high-powered blender and process/blend until smooth. In a small saucepan on low-medium heat, warm the cheese sauce, whisking constantly for about 5 minutes, or until thickened. Set aside.
Pasta
  1. Cook according to package directions. Set aside.
Assembly
  1. Add your pesto and nacho cheese sauce to the cooked pasta. You will likely not use as much as you prepared, so just add a bit of each at a time, and stop when it gets to where you want it.
  2. Season with a bit more salt & pepper, if desired.
Notes
*Almonds also work well in a pesto. As do cashews or walnuts.[br]*Prepare the nacho cheese sauce and/or pesto in advance to save on prep/cooking time!
3.2.2925


Filed Under: Pasta, Recipes Tagged With: dinner, lunch, soy free

Best Ever Vegan Fried Rice with Scrambled Tofu

May 9, 2014 36 Comments

075

I can’t even explain how good this fried rice is. I came up with the recipe on a whim awhile back. It was my first time making fried rice since becoming vegan in September of last year, and I wanted it to taste as good as I remembered fried rice tasting.

Thankfully, with a few additions (and subtractions!), this dish turned out remarkable. Even my husband, who only groans like crazy when his food is MEGA GOOD, couldn’t keep his mouth shut about it.

“You HAVE to blog this”, he said. “You HAVE TO. It’s SO GOOD.”

And so, here I am. Blogging it.

Fried-Rice-Vegan-Homemade

Traditional fried rice is made with fried egg and some kind of meat. Usually bacon – at least, that’s what was always in my fried rice growing up.

So, I had to either eliminate those ingredients, or come up with some substitutions.

I went the substitution route.

Fried-Rice-Vegan

Instead of fried egg, I added scrambled tofu, which gave the dish that yellow colour that cooked eggs do.

For bacon, I had a few options. I could use fake meat, but didn’t want to, I could use coconut bacon – but I’m not a big fan of coconut bacon, and I didn’t feel like making anything bacon-like, so I did the next best thing – I used liquid smoke in the sauce.

And guess what – it worked like a charm. Bacon flavour without the bacon. Hurrah!

Homemade-Vegan-Fried-Rice

Vegan-Fried-Rice

This is now one of my go-to meals when I am too tired to dream up something creative.

If you can cook the rice in advance, that will save you a lot of cooking time, since rice can take up to 45 minutes to cook (depending on the type you use – brown rice takes me 45 minutes to cook).

Vegan-Fried-Rice

Best Ever Vegan Fried Rice with Scrambled Tofu
Recipe Type: Entree
Author: Vegan Insanity
Prep time: 10 mins
Cook time: 1 hour
Total time: 1 hour 10 mins
Serves: 4
Whether you serve it for lunch or dinner, this vegan fried rice is one of the best you’ll ever make! It’s simple, delicious, and healthy – what more could you ask for?
Ingredients
  • Rice
  • 1 1/2 cups uncooked rice (I used brown rice)
  • Scrambled Tofu
  • 1/2 block extra firm tofu, pressed for at least 20 minutes
  • 1/2 tsp turmeric
  • 1/2 tbsp nutritional yeast
  • 1/4 tsp salt
  • 1/4 tsp onion powder
  • 1/4 tsp freshly ground black pepper
  • 1/2 tbsp olive oil
  • 1 small garlic clove, minced
  • Vegetables
  • 2 tsp olive oil
  • 1 medium carrot, diced (very small!)
  • 2/3 cup frozen peas
  • Green onions for garnish (optional)
  • Sauce
  • 2 tbsp tamari
  • 1/4 tsp salt
  • 1/2 tsp freshly ground black pepper
  • 1/4 tsp liquid smoke
  • 1 tsp sesame oil
  • 1 medium garlic clove, minced or grated
  • 1/2 tsp onion powder
  • 1 1/2 tbsp rice wine vinegar
  • 1 tbsp brown sugar
  • 2 tsp sriracha sauce (or to the heat of your liking!)
Instructions
Rice
  1. Cook rice according to package directions and set aside.
Scrambled Tofu
  1. Crumble the pressed tofu in a small bowl. Add in the turmeric, nutritional yeast, salt, onion powder, and pepper. Mix well and set aside.
  2. Heat the oil in a medium pan over medium heat.
  3. Add the minced garlic and cook for a minute or so, or until the garlic has browned lightly.
  4. Add in the tofu mixture and cook for about 5-7 minutes more, stirring often. Remove from pan and set aside.
Vegetables
  1. In the same pan that you used to cook your tofu, heat 2 tsp olive oil over medium heat, then add in the carrots and peas.
  2. Cook for about 5 minutes, or until the carrots can easily be pierced with a sharp knife. Set aside.
Sauce
  1. Whisk together all of the sauce ingredients and set aside.
Putting it all together
  1. In a large pan or wok over medium heat, add your sauce, then the rice, then the vegetables, then the scrambled tofu.
  2. Mix everything together very well, and cook until heated through, about 5 minutes.
  3. Serve, topped with a sprinkling of chopped green onions, if desired.
3.2.2807


Filed Under: Entrees, Recipes Tagged With: dinner, lunch, nut-free, soy free

Homemade Vegan Calzones with Sun-Dried Tomato & Pesto Spread

May 8, 2014 13 Comments

homemade-vegan-calzones

I don’t think you’ll find many people who don’t like pizza, but sometimes, pizza just ain’t enough – you need something new, something different.

And so, the calzone was born. I’ve never found a store-bought calzone I’ve ever liked, but this homemade version is crazy good.

Calzones-Vegan

The possibilities are endless when it comes to what you can put in your calzone! For this recipe, I chose zucchini, green olives, spinach, and a bit of vegan cheese shreds (mozzarella). Super tasty!

I love how the sauce/spread is used, instead of just regular ol’ tomato sauce. It makes the calzone much more interesting. The flavour of that stuff is incredible!

The dough is flaky, with just enough “chew” to make it taste exactly like pizza crust. What could be better than a pizza folded in half, and stuffed full of all your favourite pizza toppings?

Vegan-Calzones

Homemade Vegan Calzones with Sun-Dried Tomato & Pesto Spread
Recipe Type: Pizza
Author: Vegan Insanity
Prep time: 1 hour 15 mins
Cook time: 10 mins
Total time: 1 hour 25 mins
Serves: 3-4
Ingredients
  • Dough
  • 1 1/2 Cups kamut or all-purpose flour
  • 1 1/8 tsp fast acting yeast
  • 1/2 tsp salt
  • 1/2 tbsp coconut sugar
  • 1 tbsp olive oil
  • 3/4 cup warm water, or as needed
  • Sun-Dried Tomato & Pesto Spread
  • 1/2 cup raw cashews (soaked for at least 4 hours)
  • 1 large garlic clove
  • 1/3 cup sun-dried tomatoes, drained
  • 1 medium tomato
  • 1/3 cup fresh basil, packed
  • 1/4 tsp chili powder
  • 1/4 tsp freshly ground black pepper
  • 1/2 tsp salt
  • 2 tbsp olive oil
  • Assembly
  • Veggies of your choice
  • Vegan cheese (optional, but recommended)
Instructions
Dough
  1. Add the flour, yeast, salt, sugar and oil to a large mixing bowl. Mix until combined.
  2. Add the water, as needed, until the dough is soft and has come together nicely. Form into a ball.
  3. Place the dough ball in a well-oiled bowl and cover with a clean dish towel. Allow to rise, until it has doubled in size, which can take up to 1 hour (it was 40 minutes for me).
Sun-Dried Tomato & Pesto Spread
  1. Add all ingredients to a high-powered blender or food processor and blend/processed until smooth, adding a bit of water, if needed.
Assembly
  1. Preheat oven to 500F.
  2. Divide the dough into 3 or 4 portions. and roll each one into a thin layer. Be careful not to make them too thick!
  3. Spread the sauce on each calzone, without going all the way to the edges.
  4. Add the “toppings” – veggies and vegan cheese – on one side of the calzone.
  5. Fold into a semicircle and seal the edges.
  6. Poke a few holes into each calzone, brush with a bit of oil, and sprinkle some dried basil on top (or fresh!).
  7. Cook for about 10 minutes, or until the bottoms have browned nicely.
  8. Enjoy!
3.2.2310


Filed Under: Pizza, Recipes Tagged With: dinner, lunch, soy free

Loaded Breakfast Potatoes with Mushroom Gravy

May 7, 2014 7 Comments

Loaded-Breakfast-Potatoes

I have a thing for big, hot, savory breakfasts. They’re what I look forward to every morning! First, my daily smoothie, then a big plate of something yummy – usually potatoes.

Yesterday morning was no different. I woke up craving potatoes – but not my usual hash browns with veggies. No, I wanted something a bit more elaborate.

Enter – loaded breakfast potatoes (with some mushroom gravy inspiration from Jackie)!

Breakfast-Potatoes

You know, I’ve never been a big fan of mushrooms, but I love them in vegan gravy. So when I saw a bunch of cremini mushrooms on sale this past weekend, I snatched them up, knowing that a pot of mushroom gravy was in my future.

And what’s the best thing to do with gravy? Pour it over potatoes, of course!

So, that’s just what I did with this breakfast dish.

Vegan-Breakfast-Potatoes

Loaded-Vegan-Breakfast-Potatoes

I suggest cooking the gravy first, then keeping it warm on the stove while you prepare your potatoes. Or you can cook them at the same time, if you’re good at multi-tasking!

Use any ol’ greens you like in this dish – I used dandelion greens because I thought they’d work well, but I also think spinach, kale, arugula and even collards would be very tasty!

Pile your loaded potatoes on a plate and drown them in mushroom gravy. Then go ahead and stuff your face. It will be hard not to!

Breakfast-Potatoes-Vegan

Adapted from Vegan Yack Attack.

Loaded Breakfast Potatoes with Mushroom Gravy
Recipe Type: Breakfast
Author: Vegan Insanity
Prep time: 10 mins
Cook time: 40 mins
Total time: 50 mins
Serves: 3 large servings
Ingredients
  • Mushroom Gravy
  • 1 1/2 cups coconut milk, light or full-fat (I used full-fat)
  • 1/4 cup onion, minced
  • 2 garlic cloves, minced
  • 1/4 cup cremini mushrooms, chopped very small
  • 1 tablespoon corn starch
  • 2 1/2 tbsp nutritional yeast
  • 1 tbsp tamari
  • Salt & freshly ground black pepper, to taste
  • Potatoes
  • 1 tbsp olive oil
  • 3 cups russet potatoes, chopped into small cubes
  • 1/4 cup onion, minced
  • 1/4 cup tomato, diced
  • 1/4 cup red bell pepper, diced
  • Salt & freshly ground black pepper, to taste
  • 3/4 cup dandelion greens, chopped
Instructions
Mushroom Gravy
  1. In a small pot, add 1/4 cup of your coconut milk, and bring it to a simmer over medium heat.
  2. Next, add the onion, saute for 2-3 minutes, then add in the garlic. Cook for another 2-3 minutes, or until the onions are slightly clear.
  3. Add the mushrooms and saute until they have darkened and reduced in size, about 7 minutes.
  4. Add the corn starch and mix it in very well.
  5. Add the rest of the coconut milk, the nutritional yeast and the tamari. Bring to a boil, then cook on low, stirring occasionally, until the gravy reaches the consistency you like (took about 5 minutes for me). Season with salt & pepper and serve over your cooked potatoes.
Potatoes
  1. Heat olive oil in a large pan over medium heat. Once it’s hot, add the potatoes, cover, and cook for about 12 minutes, stirring occasionally.
  2. Add the onions, and cook for about 5 minutes more.
  3. Add the tomatoes and bell pepper. Cook, uncovered, 5-10 minutes more, or until the potatoes are crispy and browned.
  4. Fold in the dandelion greens, and then season with salt and pepper.
3.2.2310


Filed Under: Breakfast, Recipes Tagged With: nut-free

  • « Previous Page
  • 1
  • …
  • 11
  • 12
  • 13
  • 14
  • 15
  • …
  • 19
  • Next Page »

I'm Cassie - vegan food lover and animal rights activist. I live in Vaughan, Ontario, right near Toronto, with my husband, our 2 kids, 3 cats, and a dog that thinks he's a cat, too. I love to cook and share delicious vegan food with everyone I know. MORE →


Top 10 Posts

  • Super Simple Vegan Pad Thai
  • Vegan Cauliflower Mac & Cheese
  • Vegan Veggie & Black Bean Enchiladas
  • Zucchini Fritters with Vegan Sour Cream
  • How to Make Vegan Ricotta Cheese
  • 30 Tasty Vegan Lunch Ideas
  • 3 Ingredient Vegan Gnocchi
  • Best Ever Vegan Fried Rice with Scrambled Tofu
  • Quinoa & Chickpea Tabbouleh Salad
  • 20 Delicious Vegan Dinner Ideas
Top 10 Vegan Cookbooks

Copyright © 2025 · Genesis Framework by StudioPress · WordPress · Log in