Vegan Recipes from Cassie Howard

Vegan Insanity >> Vegan recipes that are delicious and easy to make. Plus, kitchen, cooking & shopping tips!

  • Home
  • About
    • Inside My Vegan Pantry
    • My 1 Year Vegan Anniversary
    • How I Got Over My Cheese Addiction
  • Recipes
    • Breakfast
    • Lunch
    • Dinner
    • Dessert
    • Snacks/Appetizers
  • Resources
    • Is it Expensive to be Vegan?
    • Top 10 Kitchen Tools
    • Top 10 Cookbooks
    • Vegan Picks
    • How-to Guides
    • Cooking Tips
    • Recipe Ideas
  • Contact

The Breakfast Smoothie Bowl

May 30, 2014 3 Comments

I must have been living under a rock for awhile, because I hadn’t heard of smoothie bowls until last month.

Now, they seem to be popping up everywhere I look! Not that I’m complaining or anything…

Smoothie-Bowl

What is a smoothie bowl, you ask? Simple: a smoothie – in a bowl (made a bit thicker). Yes, I’m serious. Yes, it’s way more fun than it sounds. Yes, it’s just as tasty in a bowl as it would be in a glass.

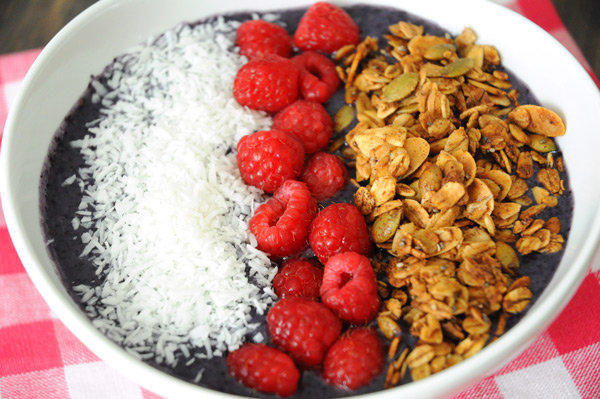
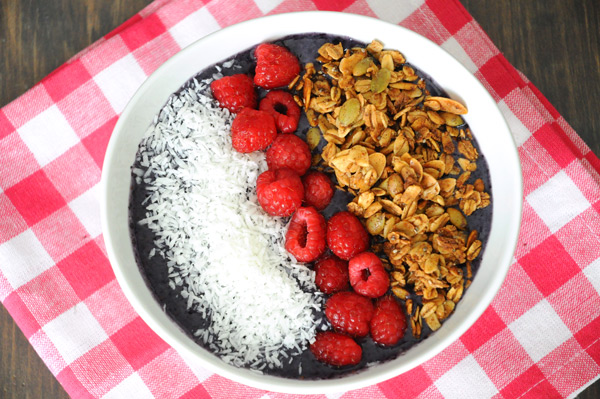
This was my first every smoothie bowl that I made last week. It’s just frozen blueberries, a large banana, some ground flax seed and a bit of almond milk, topped with homemade granola, coconut and fresh raspberries.

Big-Smoothie-Bowl

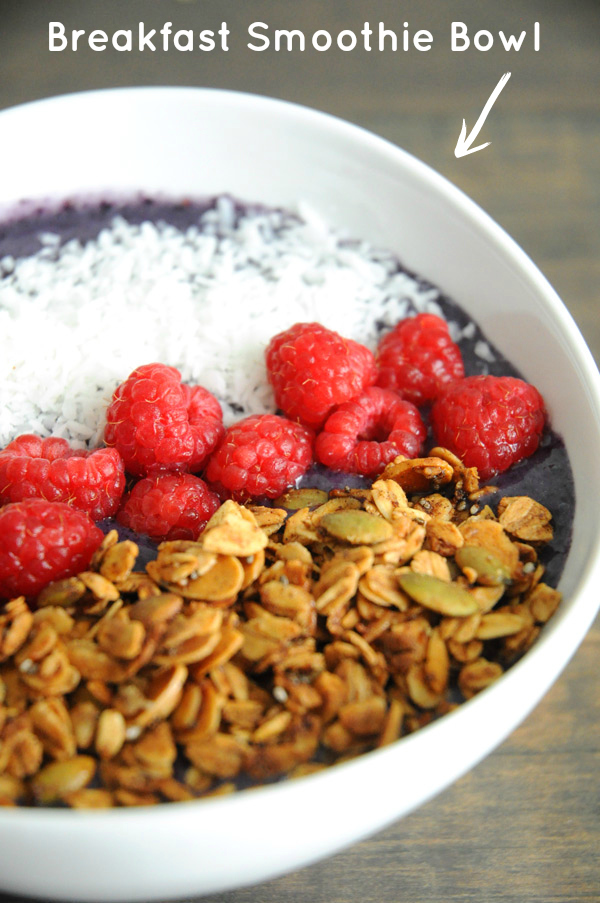
It did not disappoint. I love that I can add all kinds of toppings, which you can’t really do with a “regular” smoothie (drinking shredded coconut and granola would probably not work very well)!

Now, what can I make next? If you’ve made smoothie bowls before, what do you like putting in yours?

Berry-Smoothie-Bowl


The Breakfast Smoothie Bowl
Recipe Type: Smoothie
Author: Vegan Insanity
Prep time: 5 mins
Total time: 5 mins
Serves: 1
Ingredients
  • 1 large ripe banana
  • 1 cup frozen mixed berries
  • 1 tbsp ground flax seed (optional)
  • 1 cup non-dairy milk (I used almond)
  • Topping of choice (I used granola, coconut and fresh raspberries)
Instructions
  1. Add all ingredients (except toppings) to your blender, and blend until smooth & creamy. You want it to be a bit thicker than a traditional smoothie that you would drink.
  2. If the mixture is too thin, add another 1/2-1 banana or more berries.
  3. Scoop mixture into your bowl and top with your toppings of choice. Eat with a spoon!
3.2.2704


Filed Under: Breakfast, Recipes Tagged With: nut-free, oil free, quick and easy, smoothies, soy free

How to Make Chia Seed Jam

May 29, 2014 6 Comments

Chia-Seed-Jam I can’t believe I’ve kept this super easy jam recipe a secret from you, but it seems as though I did. I’ve always loved homemade jams, and would buy them often at farmer’s markets in the summer, but never made them myself because I felt like it would be too much work. A few months back, a friend of mine introduced me to chia seed jam, and I’ve been hooked ever since. Now I make homemade jam all the time. Vegan-Chia-Seed-Jam I love how simple it is to prepare a fresh batch of my very own jam, adding as much, or as little, sweetener as I want. Store-bought jams are almost always way too sweet, aren’t they? I think so. Strawberry-Chia-Seed-Jam
So far I’ve only made blueberry jam and this strawberry jam, but once I do some raspberry picking this summer, I’ll make a batch of raspberry jam, too. Blackberry would also be nice. And peach. And grape. Ahhh, there are so many options! Toast-with-Chia-Seed-Jam And all thanks to the goodness of chia seeds, which are amazing because they: Balance blood sugar Add healthy omega-3 oil to your diet Make you feel more energized Cut your cravings Combat diseases Provide you with stronger teeth & bones Are a great source of protein Help fight belly fat and so much more! I love these little guys. Chia-Seed-Jam-Vegan

How to Make Chia Seed Jam
Recipe Type: How-to Guide
Cuisine: Chia Seed Jam
Author: Vegan Insanity
Prep time: 5 mins
Cook time: 25 mins
Total time: 30 mins
Serves: Varies
Ingredients
  • Fruit of choice (I used 1 pound of strawberries)
  • 1/4 cup maple syrup or agave (I used maple syrup)
  • 2 tbsp chia seeds
Instructions
  1. Prepare your fruit. For my strawberries, I washed them, hulled them, and cut them into really small pieces. I’ve also made blueberry chia seed jam, and for those, I just washed the blueberries.
  2. Add your fruit and maple syrup or agave to a small pot, and heat on medium for about 10 minutes, or until the fruit starts to liquefy. Once this happens, start to gently smash your fruit. The smoother you want your jam, the more you’ll have to mash up the fruit.
  3. Once the fruit has reached your desired consistency, bring it to a boil, and allow to cook for about 5 minutes.
  4. Add in your chia seeds and stir to combine. Remove from heat and then walk away and come back in 10 minutes – voila, homemade jam!
  5. Allow the jam to cool completely before serving. Store in the refrigerator for up to 2 weeks.
3.2.2704


Filed Under: How-to Guides Tagged With: gluten free, oil free, quick and easy, soy free, tips and tricks

Best Ever Banana Crumb Muffins

May 28, 2014 Leave a Comment

banana-muffins-photo

I bought a box of about 40 bananas last week (what? you don’t do that too?) because I have plans for lots of banana ice cream now that the hot weather is here, and I also wanted to make some banana desserts & breakfasts.

So – yesterday I made vegan banana muffins. But not just any banana muffins – no, I made banana crumb muffins. And yes, the crumb part is necessary to mention. In fact, I think it’s safe to say that the “crumbs” totally make this muffin.

vegan-banana-crumb-muffins

Just look at all that crumbly goodness. It tastes just as good sprinkled in your mouth as it does on the muffins.

Just sayin’.

vegan-banana-muffins

These vegan banana crumb muffins are awesome for many reasons:

They take just 30 minutes to make, from start to finish
They have just the right amount of sweetness
They’re super moist
They’re very filling (but it’s hard to eat just one!)

banana-crumb-muffins


I changed up the recipe I found on Minimalist Baker just a bit, and this has now become a keeper recipe for our family. In just 24 hours, we devoured all 12 muffins!

Actually, that may have happened in less than 12 hours…

Stop whatever you are doing and GO MAKE THESE MUFFINS! You’ll be happy you did.

banana-crumb-muffins-vegan

Best Ever Banana Crumb Muffins
Recipe Type: Breakfast, Snack
Author: Vegan Insanity
Prep time: 10 mins
Cook time: 20 mins
Total time: 30 mins
Serves: 12
Ingredients
  • Crumb Topping
  • 1/4 cup brown sugar
  • 1/4 cup kamut flour
  • 2 tbsp vegan butter (I used Earth Balance)
  • Banana Muffins
  • 2 flax eggs (2 tbsp ground flax seed, 6 tbsp water)
  • 4 medium bananas, mashed (make sure they are very ripe)
  • 1/2 cup brown sugar, packed
  • 1/4 cup vegan butter (I used Earth Balance), melted
  • 1 1/2 tsp vanilla
  • 2 tsp baking soda
  • 1/2 tsp salt
  • 1 1/2 cups kamut flour
  • 1/2 cup rolled oats
  • 1/4 cup walnuts, optional
Instructions
Crumb Topping
  1. Using your fingers, mix together the brown sugar, flour and butter in a small bowl, until it resembles wet sand. Set aside.
Banana Muffins
  1. Preheat oven to 375F and spray your muffin tin with non-stick cooking spray (or use coconut oil).
  2. In a large mixing bowl, add your ground flax & water for the flax eggs. Allow to sit for about 10 minutes.
  3. After 10 minutes, add the mashed bananas, brown sugar, baking soda, salt, vanilla & melted vegan butter. Mix well.
  4. Add flour, rolled oats, and walnuts, and stir until just combined. Do not over mix.
  5. Fill your muffin tins about 3/4 of the way fill with the banana muffin mix.
  6. Sprinkle your crumb topping over each muffin.
  7. Bake for 15-20 minutes or until tops are golden brown or until a toothpick comes out clean.
Notes
[i]Adapted from [url href=”http://minimalistbaker.com/vegan-banana-crumb-muffins/” target=”_blank”]Minimalist Baker[/url].[/i]
3.2.2704


Filed Under: Breakfast, Recipes Tagged With: muffins, nut free option, quick and easy

Quinoa & Chickpea Tabbouleh Salad

May 21, 2014 5 Comments

Quinoa-Chickpea-Tabbouleh Oh, how I love simple meals! We visited my mother in law for Mother’s Day this past weekend (the weekend after the actual holiday, because my hubby was sick on that day), and I brought along this dish for two reasons: 1. It’s SO quick and easy to prepare. 2. It’s travels well. 3. It’s freakin’ delicious, light, healthy and tastes good straight out of the fridge. Okay, that was more than 2 reasons. All legit, though, of course. Quinoa-and-Chickpea-Tabbouleh-Vegan We served it along side these oven roasted garlic sweet potatoes, and WOW DELICIOUSNESS. The two went very well together. Vegan-Quinoa-and-Chickpea-Tabbouleh
This protein packed salad is the way to go if you’re looking for a quick and easy side dish or lunch. I found it very filling, and it’s also healthy enough that you can have multiple servings and not feel guilty about it. I anticipate this dish being our regular potluck contribution to family gatherings! Quinoa-and-Chickpea-Tabbouleh

Quinoa & Chickpea Tabbouleh Salad
Recipe Type: Salad, Side
Author: Vegan Insanity
Prep time: 15 mins
Total time: 15 mins
Serves: 8
Ingredients
  • 1 cup cooked quinoa
  • 1 1/2 cups chickpeas (if using canned, drain and rinse them first)
  • 1 small cucumber, sliced
  • 1 large garlic clove, minced
  • 2 cups cherry tomatoes, sliced in half
  • 1 cup green onion, chopped small
  • 1 cup fresh parsley, chopped
  • 1 cup mint leaves, chopped
  • 1/3 cup lemon juice (2 large or 3 medium lemons)
  • 1/3 cup extra virgin olive oil
  • salt and freshly ground black pepper, to taste
Instructions
  1. Put the cooked quinoa in a large bowl. Add the chickpeas, cucumbers, minced garlic, cherry tomatoes, green onion, parsley and mint. Toss well to combine.
  2. In a small bowl, whisk together the lemon juice, extra virgin olive oil and some salt and pepper. Adjust S&P as needed.
  3. Pour the dressing over the quinoa & chickpea mixture and mix well. Adjust seasonings again, if necessary.
  4. Serve cold or at room temperature. *
Notes
*This dish lasts 2-3 days in the refrigerator, so feel free to make it ahead of time to save even more time in the kitchen.
3.2.2704


Filed Under: Recipes, Salad Tagged With: beans and legumes, dinner, gluten free, lunch, quick and easy, quinoa, soy free

Easy Cheesy Vegan Quesadillas

May 15, 2014 4 Comments

Vegan-Quesedillas

I was craving a super quick lunch the other day. I had so many things on my to-do list, and making an elaborate lunch wasn’t one of them. I initially considered pasta, because it’s easy, filling and mighty delicious – but, I was out of pasta.

Dang.

So, I stared in my pantry for a few minutes and then I spotted the tortillas. Ding ding ding!

Cheesy-Vegan-Quesedillas

I almost always have soaked cashews in my refrigerator, since I cook with them a lot, and thankfully, I had some this day, and used them to make the yummy cashew cheese for this quick meal.

Easy-Vegan-Quesedillas

The only thing that took awhile was cooking 4 quesadillas, since they take about 5-8 minutes each. But other than that, this was an easy lunch to throw together, using ingredients I already had on hand.

I’d also like to mention that these vegan quesadillas are kid-approved (and that’s saying something, since my kids want to eat nothing but chocolate, bread, and plain pasta)!

Easy-Cheesy-Vegan-Quesedillas

I used vegan sour cream to dip my quesadillas in, but you can also used mashed avocado (or guacamole!), hummus, vegan nacho cheese, or just eat them plain. No matter how you eat them – they are damn good. Try some for lunch today!

Easy Cheesy Vegan Quesadillas
Recipe Type: Appetizers, Snacks, Lunch
Author: Vegan Insanity
Prep time: 15 mins
Cook time: 30 mins
Total time: 45 mins
Serves: 4
Ingredients
  • Cashew Cheese
  • 1 1/2 cups raw cashews (soaked for at least 2 hours)
  • 1/4 cup water
  • 3 tbsp lemon juice
  • 2 1/2 tbsp nutritional yeast
  • 1 garlic clove
  • Salt & freshly ground black pepper, to taste
  • Quesadillas
  • 8 flour tortillas
  • 3/4 cup cooked black beans (if using canned, drain and rinse first)
  • 3/4 cup corn (I used frozen)
  • 1/3 cup black olives, sliced
  • 3/4 cup tomatoes, diced (I used 1 large beefsteak tomato)
  • 1/4 cup parsley, chopped
  • 3 tbsp green onions, chopped small
  • 1 large avocado, pitted and sliced
  • 1 tbsp coconut oil
Instructions
Cashew Cheese
  1. Add all of the cashew cheese ingredients into a food processor or high-speed blender and process/blend until smooth. Refrigerate until ready to use.
Quesadillas
  1. In a medium bowl, mix together the black beans, corn, olives, diced tomato and parsley. Set aside.
  2. Add a generous layer of cashew cheese to a tortilla, top with the black bean mixture, then cover with another tortilla, press down lightly, then set aside. Repeat with remaining tortillas.
  3. Heat a large pan over medium heat, add 1/2 tbsp oil, and add your quesadilla. Cook until the bottom of the quesadillas is golden brown (3-4 minutes), then flip and cook until the other side is golden brown. Repeat with remaining quesadillas.
  4. Plate your quesadillas, and sprinkle some green onions on top of each one. Serve with vegan sour cream, mashed avocado, or whatever else you like with your quesadillas.
3.2.2708


Filed Under: Recipes, Snacks & Appetizers Tagged With: beans and legumes, dinner, lunch, quick and easy, soy free

Healthy & Delicious Trail Mix Cookies

May 14, 2014 5 Comments

Healthy-Trail-Mix-Cookies

I was trying to come up with a way to get more nuts and seeds into my kids’ mouths, since they usually refuse to eat them unless they’re covered in chocolate.

I tried putting them in oatmeal, in smoothies, in cereal – anywhere I could sneak them in, but they always seemed to know, and they hated that I “tricked” them.

Trail-Mix-Cookies-Vegan

Even though I explained that they needed to eat their nuts and seeds in order to be healthy and get all of the nutrients these foods provided, they didn’t care.

They are kids, afterall. And kids don’t like it when you’re right and they’re wrong.

Trail-Mix-Cookies

I asked them how I could make them eat these seeds and nuts, and the only thing they agreed to try was if they were in cookies.

So, cookies it was. Of course, I didn’t want them to be loaded with sugar, so I loaded them up with lots of healthy options instead.

And a few chocolate chips. Because a few chocolate chips never hurt anybody.

Vegan-Trail-Mix-Cookies

And wouldn’t you know it – they ate the cookies! Which means they ate the seeds & nuts. Success!

The funny thing about this story is that they now ask for raw nuts on a regular basis. These cookies won them over! Thank you, trail mix cookies.

Adapted from Oh She Glows.

Healthy & Delicious Trail Mix Cookies
Recipe Type: Cookies
Author: Vegan Insanity
Prep time: 20 mins
Cook time: 14 mins
Total time: 34 mins
Serves: 24 cookies
Ingredients
  • 1 flax egg (1 tbsp ground flax + 3 tbsp water)
  • 1 cup oat flour (just take rolled oats and throw them in your food processor)
  • 1/2 cup almond flour (just take almonds and throw them in your food processor until they resemble a “crumb-y” flour)
  • 1/2 cup rolled oats
  • 1/2 cup sliced almonds
  • 1/4 cup coconut sugar
  • 1/4 cup shredded unsweetened coconut
  • 1/4 cup chocolate chips (or finely chopped chocolate)
  • 2 tbsp sunflower seeds
  • 2 tbsp sesame seeds
  • 2 tbsp chia seeds
  • 2 tbsp dried cranberries
  • 1 tsp cinnamon
  • 1/2 tsp salt
  • 1 1/2 tsp baking powder
  • 1/4 cup peanut butter
  • 1/4 cup coconut oil
  • 1/4 cup maple syrup or agave (I used maple syrup)
  • 1 1/4 tsp vanilla
Instructions
  1. Preheat oven to 350F and line a baking sheet with parchment paper or a baking mat.
  2. Mix together the ground flax and water in a small bowl and set aside for about 10 minutes.
  3. In a large mixing bowl, whisk together the rest of the ingredients, including the flax egg. Yes, add every last ingredient to your bowl!
  4. Scoop about 2 tbsp of the cookie “dough” and form into balls. Place them on your prepared baking sheet, and flatten slightly with your hand.
  5. Bake for 12-14 minutes, or until lightly browned on the bottoms. Allow to cool for at least 15 minutes before handling.
3.2.2310


Filed Under: Dessert, Recipes Tagged With: chocolate, cookies, quick and easy, soy free

Vegan Poutine That Will Knock Your Socks Off

May 4, 2014 4 Comments

Vegan-Poutine

This is one of my favourite comfort foods. When I’m having a bad day, I don’t want a bowl of salad. I want a big plate of fries, smothered in gravy and cheese.

I rarely eat this way, but when I do, I don’t scrimp.

Homemade-Vegan-Poutine

This vegan poutine is really simple, mostly because I cheat by using vegan cheese shreds. The only thing I have to make myself are the fries and gravy.

Which, thankfully, are very, very easy.

Poutine-Vegan

So, if you’re having a bad day, dig in to a plate of vegan poutine. And enjoy every scrumptious minute of it. Then – start eating healthy again immediately afterward!

Vegan Poutine That Will Knock Your Socks Off
Recipe Type: Snacks
Author: Vegan Insanity
Prep time: 15 mins
Cook time: 20 mins
Total time: 35 mins
Serves: 2-4
Easy vegan poutine!
Ingredients
  • Fries
  • 2 large or 3 medium russet potatoes, cut unto wedges or thin strips
  • 2 tbsp olive oil
  • salt & pepper, to taste
  • Gravy
  • 3 tbsp vegan butter (I used Earth Balance)
  • 2 tbsp flour (I used whole wheat)
  • 2 cups vegetable broth
  • 2 tbsp yellow mustard
  • 2 tbsp soy sauce
  • Other Items
  • 1/2-1 cup vegan cheese shreds (I used Daiya mozzarella shreds)
Instructions
Fries
  1. Pre-heat your oven to 425F.
  2. In a large bowl, drizzle the olive oil over your fries, and mix together well. Sprinkle with a bit of salt and pepper.
  3. Arrange on a baking sheet and cook for about 20-30 minutes (depending on how thick you made your fries), turning once. Remove from oven once they are cooked and divide between 2-4 plates.
Gravy
  1. Heat a small pot over medium heat.
  2. Add in the vegan butter, and once it has melted add in the flour. Whisk together until no clumps remain, and cook for about 1-2 minutes.
  3. Add in the vegetable broth, mustard and soy sauce and whisk again.
  4. Let the gravy thicken for a few minutes.
Putting it all together
  1. On top of your cooked fries, add vegan cheese shreds, then pour the thickened gravy over top. Enjoy immediately.
3.2.2310


Filed Under: Recipes, Snacks & Appetizers Tagged With: lunch, nut-free, quick and easy, soy free

Homemade Peanut Butter in Minutes

April 30, 2014 Leave a Comment

Homemade nut butters have got to be one of the easiest things to make, ever. With only 1 ingredient, you can have delicious, creamy almond, peanut, cashew… any type of nut butter you desire, in just minutes.

Vegan-Peanut-Butter

Skip the store-bought stuff that is loaded with junk on top of more junk. Homemade nut butter is where it’s at.

Not only is it easy to make, and delicious, but it’s also way, way cheaper than buying it from a grocery store.

Peanut-Butter-Vegan

In our house, we go through a ton of peanut butter every week. Our 2 kids eat it almost daily, we have it in oatmeal, in smoothies, and in a lot of baked goods that I whip up. That means I always need to have peanuts on hand to make delicious homemade peanut butter at least twice each month.

Homemade-Peanut-Butter

I use either my KitchenAid food processor or the Twister Jar for our Blendtec blender to make my nut butters (I used the food processors for the peanut butter in these photos).

Both of them work really great for peanut butter, but I prefer the Twister Jar because it usually gets the peanut butter much smoother. If you like a chunkier peanut butter, you can just use a food processor.

When you make this peanut butter, the peanuts will go through various stages:

  • Crushed peanuts
  • Fine peanut powder
  • Peanut paste
  • Peanut butter dough
  • Chunky peanut butter
  • Smooth peanut butter

Once it’s done, it will be pretty thin because of the warmth from the food processor/blender, but let it sit in the fridge for a few hours and it will thicken up.

Homemade Peanut Butter in Minutes
Recipe Type: Condiments
Author: Vegan Insanity
Prep time: 7 mins
Total time: 7 mins
Serves: 1 1/2 cups peanut butter
Homemade peanut butter in no time flat! Easy, delicious and inexpensive. What could be better?
Ingredients
  • 2 cups of peanuts (I used raw & unsalted, then roasted them in the oven for about 5 minutes and allowed to cool)
  • 1/2 tsp salt (optional)
  • 1 tbsp coconut sugar (optional)
Instructions
  1. All peanuts to your food processor or blender, the process/blend until it reaches the smoothness you like, stopping to scrape the sides of the canister if necessary. For me (I like very smooth peanut butter), it took about 7 minutes in the food processor.
  2. Add in the salt & coconut sugar, if desired, and pulse a few times to incorporate.
3.2.2310


Filed Under: Dips, Spreads, Sauces, Recipes Tagged With: gluten free, nut butters, oil free, quick and easy, soy free

  • « Previous Page
  • 1
  • 2
  • 3
  • 4
  • 5
  • 6
  • Next Page »

I'm Cassie - vegan food lover and animal rights activist. I live in Vaughan, Ontario, right near Toronto, with my husband, our 2 kids, 3 cats, and a dog that thinks he's a cat, too. I love to cook and share delicious vegan food with everyone I know. MORE →


Top 10 Posts

  • Super Simple Vegan Pad Thai
  • Vegan Cauliflower Mac & Cheese
  • Vegan Veggie & Black Bean Enchiladas
  • Zucchini Fritters with Vegan Sour Cream
  • How to Make Vegan Ricotta Cheese
  • 30 Tasty Vegan Lunch Ideas
  • 3 Ingredient Vegan Gnocchi
  • Best Ever Vegan Fried Rice with Scrambled Tofu
  • Quinoa & Chickpea Tabbouleh Salad
  • 20 Delicious Vegan Dinner Ideas
Top 10 Vegan Cookbooks

Copyright © 2025 · Genesis Framework by StudioPress · WordPress · Log in